Wednesday, October 19, 2011

Change axapta form color based on the company

how to make a form color change in Dynamics AX based on the company that was logged in.


To do this, we need to create/override run() method in SysSetupFormRun class. 


Please refer to the code sample below. 
It shows how to change the color to red or yellow based on the company DAS or DMO.

public void run()
{
    int red;
    int yellow;
    ;


    super();


    red = WinAPI::rgb2int(255,0,0);
    yellow = WinAPI::rgb2int(204,255,0);


    this.design().colorScheme(FormColorScheme::RGB);


    switch(curext())
    {
        case "DAS":
            this.design().backgroundColor(red);
            break;


        case "DMO":
            this.design().backgroundColor(yellow);
            break;


        default:
            break;
    }
}

Find method for Dynamics AX temporary tables

how to create a find method for a temporary tables in Axapta, and the differences between normal and temporary tables in this case.

In general, each instance of a temporary table, and it's associated data, will only exist while the buffer variable used to access it is in scope.
You can point multiple buffer variables to the same instance of a temporary table by using either the .setTmpData() method or by directly assigning the buffers to each other, identically to normal tables. In this way, even if your original buffer variable goes out of scope, your data will be retained while one of the other referencing variables remains.
Be aware that static table methods -such as find()- will not work with temporary tables unless you pass through the buffer variable to the method.
For example, this method will not work on a temporary table, as the tempTable variable used is newly created and will always contain no records.


//This won't work on temporary table
public static TempTable find(AccountNum _accountNum, 
                             boolean    _forUpdate = false)
{
    TempTable tempTable;
    ;

    if(_accountNum)
    {
        tempTable.selectForUpdate(_forUpdate);

        select firstonly tempTable
            where tempTable.AccountNum == _accountNum;
    }

    return tempTable;
}

If you want to have a find() method on your temporary table, then you will need to modify it slightly to pass through a reference to our populated temporary table.

//Use this pattern instead
public static TempTable find(TempTable  _tempTable,
                             AccountNum _accountNum, 
                             boolean    _forUpdate = false)
{
    if(_accountNum)
    {
        _tempTable.selectForUpdate(_forUpdate);
        select firstonly _tempTable
            where _tempTable.AccountNum == _accountNum;
    }

    return _tempTable;
}

And we call the method this way:

TempTable     localTempTable;
AccountNum    localAccountNum;
;

...

localTempTable.setTmpData(populatedTempTable);
TempTable::find(localTempTable, localAccountNum);

if(localTempTable)
... 

Read more...

Working with dates in Dynamics AX

Axapta x++ code to work with dates. Exists others ways to do that (DateTimeUtil), but I think this is the easiest way to work with dates.


Add days to a date:
systemdateget() + 5; //Add 5 days to a date


Add months to a date (we use a Global class function):
dateMthFwd(systemdateget(), 3); //Add 3 months to a date


Add years to a date (we use the same function than the add months to a date, because there isn't a specific function to add years in the Global class):
dateMthFwd(systemdateget(), 24); //Add 2 years to a date

Filtering Excel and CSV files in a dialog

Axapta x++ code, that allow us to filter XLSX and CSV files in a dialog box...


This is useful if you want to show only this type of files in a selection.

public Object dialog()
{
    DialogRunbase       dialog = super();
    #AviFiles
    #Excel


    dialogFilename = dialog.addField(typeId(FilenameOpen));
    dialog.filenameLookupFilter(["@SYS28576",#XLSX,"@SYS100852","*.csv"]);
    dialog.filenameLookupTitle("Upload from EXCEL/CSV");
    dialogFilename.value(filename);


    return dialog;
}

Using Like in axapta x++ Query

Sometimes, we want to filter records in Dynamics AX Query, using Like criteria and we don't know how to do it... 


The way to do that is using DataAreaId as a FieldId to filter.


In this example, we want to filter the InventTable records that the ItemId begins with "01", ends with "00" and has a length of 10 chars.

Query createQuery()
{
    Query                   q;
    QueryBuildDataSource    qbdsInventTable;
    ;


    q = new Query();


    qbdsInventTable = q.addDataSource(tablenum(InventTable));


    qbdsInventTable(fieldnum(InventTable, DataAreaId))
                    .value(strfmt('(ItemId like "%1")',"01??????00"));


    return q;
}

Browse lines in a form in Dynamics AX

Axapta X++ code to browse lines in a form in Microsoft Dynamics AX.


The function updates field value of all lines of the LedgerJournalTrans form (the field is a new created field):


Also, the function returns the initial position or line in the form.


void clicked()
{
    int pos;
    ;


    super();


    pos=LedgerJournalTrans_DS.getPosition();


    LedgerJournalTrans_DS.research();


    LedgerJournalTrans.DAS_Transfer=NoYes::Yes;
    LedgerJournalTrans.update();


    while(LedgerJournalTrans_DS.queryRun().next())
    {
        LedgerJournalTrans.DAS_Transfer=NoYes::Yes;
        LedgerJournalTrans.update();
    }


    LedgerJournalTrans_DS.research();


    LedgerJournalTrans_DS.setPosition(pos);
}

Change company in Dynamics AX 2009

Hi, everybody!

In Microsoft Dynamics AX Axapta, sometimes, we can to insert/update/delete records in different companies or insert/update/delete according to the company we are...

In Dynamics AX 2009, exists the "changeCompany" function, that allow us to do that easily.

Here's an example:

static void main()
{
    CustTable custTable;
    ;

    //Assume that you are running in company 'aaa'.
    changeCompany('bbb') //Default company is now 'bbb'.
    {
        custTable = null;
        while select custTable
        {
            //custTable is now selected in company 'bbb'.
        }
    }


    //Default company is again set back to 'aaa'.

    changeCompany('ccc') //Default company is now 'ccc'.
    { 
        //Clear custTable to let the select work
        //on the new default company.
        custTable = null;
    

        while select custTable
        {
            //custTable is now selected in company 'ccc'.
        } 
    }

    //Default company is again 'aaa'.

}

Good DaXing!

Send multiple field to another form or object (parmObject (Container))

1. Send
void clicked()
{
    Args  args = new Args();
    ContainerClass conClass_Obj;
    Container conSend;
   ;

         conSend = conins(conSend, 1, "Call Of Duty");
         conSend = conins(conSend, 2,"BattleField");
         conSend = conins(conSend, 3, "Assisins Creed");
         conSend = conins(conSend, 4, "retrive hell");
         conClass_Obj = new ContainerClass(conSend);
         Args.parmObject(conClass_Obj);
         new MenuFunction(menuitemdisplaystr(test_ParamObject_Recieve), MenuItemType::Display).run(args);
}
2. Receive
public void init()
{
    //super();
    str s1,s2,s3,s4;
    containerClass conClass_Obj;
    container conRec;
    Args args;
;
    super();
    args = new args();
    conClass_Obj =  element.args().parmObject();
    conRec = conClass_Obj.value();
    s1 = conpeek(conRec,1);
    s2 = conpeek(conRec,2);
    s3 = conpeek(conRec,3);
    s4 = conpeek(conRec,4);
    info(strfmt("Value1 = %1 , Value2 = %2 , Value3 = %3 ,Value4 = %4",s1,s2,s3,s4));
}

Monday, October 17, 2011

Instantiating Query Objects

Constructor of the Query class has default anytype parameter named _source. To my knowledge there are four different ways to use it:
  1. Instantiating an empty query – no parameter value should be specified:
    Query q = new Query();
  2. Instantiating a query based on the AOT query:
    Query q = new Query(querystr(Alertsetup));
  3. Instantiating a query as the copy of another query:
    Query q1 = new Query();
    Query q2 = new Query(q1);
  4. Instantiating a query from the container with the packed query
    Query q1 = new Query();
    Query q2 = new Query(q1.pack())

Tutorial: refresh, reread, research, executeQuery - which one to use?

X++ developers seem to be having a lot of trouble with these 4 datasource methods, no matter how senior they are in AX.
So I decided to make a small hands-on tutorial, demonstrating the common usage scenario for each of the methods. I have ordered the methods based on the impact on the rows being displayed in the grid.
You can download the xpo with the tutorial on my SkyDrive.

1. Common mistakes

Often, developers call 2 of the mentioned methods in the following order:
formDataSource.refresh()
formDataSource.research()

or
formDataSource.reread()
formDataSource.research()

or
formDataSource.research()
formDataSource.executeQuery()

or
formDataSource.research()
formDataSource.refresh() / formDataSource.reread()

All of these are wrong, or at least partially redundant.
Hopefully, after reading the full post, there will be no questions as to why they are wrong. Leave a comment to this post if one of them is still unclear, and I will try to explain in more detail.

2. Refresh

This method basically refreshes the data displayed in the form controls with whatever is stored in the form cache for that particular datasource record. Calling refresh() method will NOT reread the record from the database. So if changes happened to the record in another process, these will not be shown after executing refresh().
refreshEx
Does a redraw of the grid rows, depending on the optional argment for specifying the number of the record to refresh (and this means the actual row number in the grid, which is less useful for AX devs). Special argument values include -1, which means that all records will be redrawn, and -2, which redraws all marked records and records with displayOptions. Default argument value is -2.
This method should be used sparingly, in cases where multiple rows from the grid are updated, resulting in changes in their displayOptions, as an example. So you should avoid using it as a replacement for refresh(), since they actually have completely different implementations in the kernel.
Also, note, that refreshEx() only redraws the grid, so the controls not in the grid might still contain outdated values. Refresh() updates everything, since this is its intention.

3. Reread

Calling reread() will query the database and re-read the current record contents into the datasource form cache. This will not display the changes on the form until a redraw of the grid contents happens (for example, when you navigate away from the row or re-open the form).
You should not use it to refresh the form data if you have through code added or removed records. For this, you would use a different method described below.
How are these 2 methods commonly used?
Usually, when you change some values in the current record through some code (for example, when the user clicks on a button), and update the database by calling update method on the table buffer, you would want to show the user the changes that happened.
In this case, you would call reread() method to update the datasource form cache with the values from the database (this will not update the screen), and then call refresh() to actually redraw the grid and show the changes to the user.
Clicking buttons with SaveRecord == Yes
Each button has a property SaveRecord, which is by default set to Yes. Whenever you click a button, the changes you have done in the current record are saved to the database. So calling reread will not restore the original record values, as some expect. If that is the user expectation, you as a developer should set the property to No.

4. Research

Calling research() will rerun the existing form query against the database, therefore updating the list with new/removed records as well as updating all existing rows. This will honor any existing filters and sorting on the form, that were set by the user.
Research(true)
The research method starting with AX 2009 accepts an optional boolean argument _retainPosition. If you call research(true), the cursor position in the grid will be preserved after the data has been refreshed. This is an extremely useful addition, which solves most of the problems with cursor positioning (findRecord method is the alternative, but this method is very slow).

5. ExecuteQuery

Calling executeQuery() will also rerun the query and update/add/delete the rows in the grid. The difference in behavior from research is described below.
ExecuteQuery should be used if you have modified the query in your code and need to refresh the form to display the data based on the updated query.
formDataSource.queryRun().query() vs formDataSource.query()
An important thing to mention here is that the form has 2 instances of the query object - one is the original datasource query (stored in formDataSource.query()), and the other is the currently used query with any user filters applied (stored in formDataSource.queryRun().query()).
When the research method is called, a new instance of the queryRun is created, using the formDataSource.queryRun().query() as the basis. Therefore, if the user has set up some filters on the displayed data, those will be preserved.
This is useful, for example, when multiple users work with a certain form, each user has his own filters set up for displaying only relevant data, and rows get inserted into the underlying table externally (for example, through AIF).
Calling executeQuery, on the other hand, will use the original query as the basis, therefore removing any user filters.
This is a distinction that everyone should understand when using research/executeQuery methods in order to prevent possible collisions with the user filters when updating the query.

Batch job performance boost

Did you ever have trouble with the performance of your batch-job? Well maybe this small trick can shorten the time your batch runs.
The big idea: Try to split up your gigantic batch in smaller pieces. Launch a batchjob that produces many smaller batchjobs (tasks) that can handle a subset of the data you need to process. For example you can create a batch that creates a batch with sub-tasks for each company.
How do you plan a batch from code?
1
2
3
4
5
6
7
8
9
10
11
12
BatchHeader batHeader;
BatchInfo batInfo;
TstRunBase rbbTask;
;
rbbTask = TstMyBatch::construct();
batInfo = rbbTask.batchInfo();
batInfo.parmCaption("MyBatch");
batInfo.parmGroupId("");
batHeader = BatchHeader::construct();
batHeader.addTask(rbbTask);
batHeader.save();
info(batInfo.parmCaption());
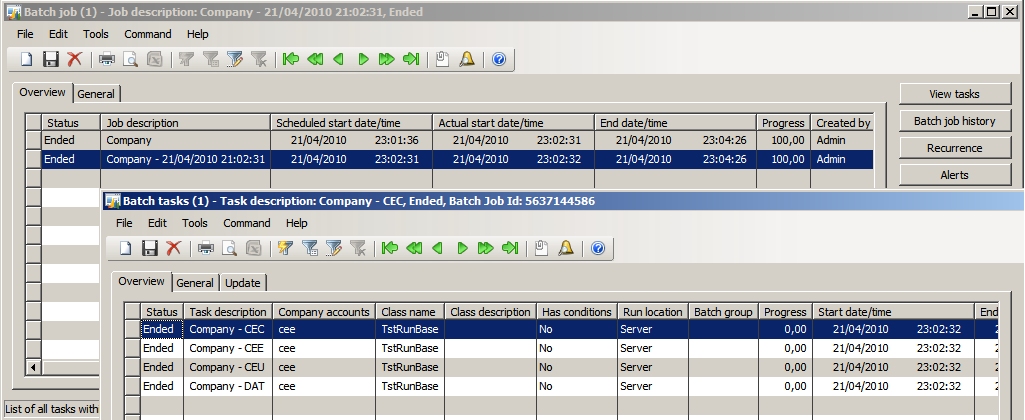
You can download a quick example I made. This is a job you can schedule and it will produce a new Batch job with a task for each company when you don’t select a company while shedualing (Class_TstRunBase.xpo). I hope this can help you.
Schedule the batch:

The result:

Setting propperties on a FormControl without AutoDeclaration

When you want to set a property of a control on a form without setting the property AutoDeclaration = yes. You can address the control trough the following code, knowing that element is a FormRun-object:
 
------------------------------------------------------------
element.design().controlName("btnOk").visible(false);
------------------------------------------------------------

Create class from code

Did you know that you can build/modify classes from code? It is actually not so hard, just use the ClassBuild-class.
1
2
3
4
5
6
7
8
9
10
11
12
13
14
15
16
17
18
19
20
21
22
static void Kishor_testClassBuild(Args _args)
{
    ClassBuild  classBuild;
    ClassNode   classNode;
    Str         myCode;
    ;
    myCode =
@"
static void Main(Args _args)
{
    ;
    info('Hello World!');
}
";
 
    classBuild = new ClassBuild("MyTest", false);
    classBuild.addMethod("Main", myCode);
 
    classNode = classBuild.classNode();
    classNode.AOTcompile();
    classNode.AOTrun();
}
The sample above will create a new class MyTest with a ‘Hello World’ Main-method and will actually save compile/save the code in the AOT and then run it. Cool?
Note: The SysDictClass/SysDictMethod-class can also help you creating proper classes and methods. Maybe I’ll blog about this later.

Saturday, October 15, 2011

Information About Indexes

Important notes to remember on Indexes:

1.       Whenever you are using an index or index hint in the query, specify the fields in the where clause as defined in index otherwise SQL doesn’t use the index specified
2.       If a table index has been disabled by setting the index’s Enabled property to No, the select statement that references the index is still valid. However, the database can’t use the index as a hint for how to sort the data, because the index doesn’t exist in the database.

Unique and Non-Unique Indexes
There are two types of indexes: unique and non-unique. Whether an index is unique is defined by the index’s AllowDuplicates property. When this property is set to No, a unique index is created. The database uses the unique index to ensure that no duplicate key values occur. The database prevents you from inserting records with duplicate key values by rejecting the insert
Setting the index’s AllowDuplicates property to Yes creates a non-unique index. These indexes allow you to enter duplicate values for the indexed fields and are used for performance reasons.

Note
A field of data type memo or container cannot be used in an index.


System Index
Microsoft Dynamics AX requires a unique index on each table so if there are no indexes on a table or all the indexes are disabled, a system index is automatically created. The system index is created on the RecId and DataAreaId fields if the DataAreaId field exists. Otherwise the system index is created on the RecId field. You can see system indexes in the database but they aren’t visible in the AOT.
If there are indexes on a table but none of them are unique, the runtime estimates the average key length of the existing indexes, chooses the index with the smallest key length and appends the RecId column to create a unique index.

Using Index Hints
To use index hints in queries you must first specify the use of hints on the server using the following procedure.
  1. Open Start > Administrative Tools > Microsoft Dynamics AX Server Configuration Utility and select the Database Tuning tab.
  2. Select Allow INDEX hints in queries and click OK.
  3. A message box prompting you to restart the AOS service appears. Click Yes to restart the AOS service. Index hints won’t be enabled until the service is restarted.
Note
A wrong index hint can have a big performance impact. Index hints should only be applied to SQL statements that do not have dynamic where clauses or order by clauses, and where the effect of the hint can be verified.
When an index hint in a select statement refers to a non-clustered index and the WHERE clause contains only the fields that are found in a clustered index on the same table, the clustered index is used instead of the index specified in the hint.


For example, if you run sp_helpindex InventTable in SQL Server Management Studio, you see that the InventTable has a clustered index on the DataAreaId and ItemId columns and a non-clustered index on the DataAreaId, ItemGroupId, and ItemId columns.

Index name
Description
Key columns
I_175ITEMIDX
Clustered, unique, primary key located on PRIMARY
DATAAREAID, ITEMID
I_175GROUPITEMIDX
Nonclustered located on PRIMARY
DATAAREAID, ITEMGROUPID, ITEMID


In the following code the clustered index will be used instead of the non-clustered index specified in the index hint.

static void IndexHint(Args _args)
{
    InventTable inv;
    ;
    select * from inv index hint GroupItemIdx
        where inv.ItemId == ‘B-R14′;
}

Send workflow notification as email

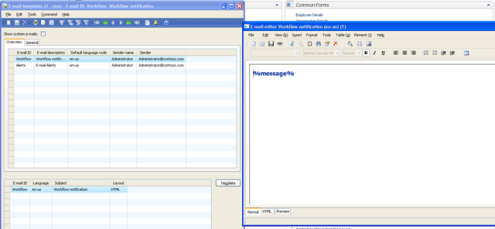
In AX2009, we can email the workflow notifications. The following steps will show you how to set this up:
1. Create an email template for workflow.
Go to Basic –> Setup –> Email Templates. Create a new email template for workflow notification.
image
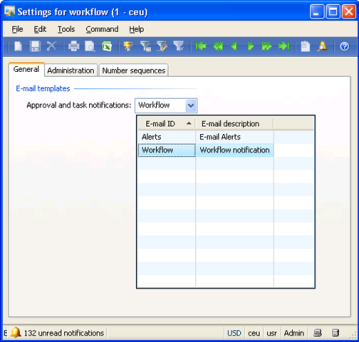
2. Set workflow to use the template that is created from step 1.
Go to Basic –> Setup –> Settings for workflow. Select the email template on the General tab.
image
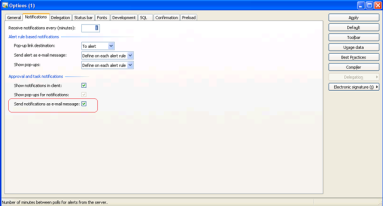
3. Enable “Send notifications as e-mail message” for the user.
Tools –> Options.
image

Tips to improve Alexa ranking

Tips to improve Alexa ranking


Alexa ranking for a site is calculated on the basis of how many visitors with the Alexa toolbar installed have visited that particular site, the results can be inaccurate most of the time.

1.) Download the Alexa toolbar and surf your own site.

2.) Have a few friends download the Alexa Toolbar and surf your site.

3.) Shift the focus of your site toward a more webmaster like theme.

4.) Participate in many webmaster forums which allow you to place your site in your signature.

5.) Write articles about webmaster topics and distribute them around the web.

6.) Optimize pages of your site for Alexa and related phrases.

7.) Buy ads on search engines to increase your traffic. Your Alexa traffic rankings will increase.

8.) Write an article with tips on how to increase your Alexa rankings.

9.) Advertise that article on the world's largest network.

10.) Join an autosurf network which exchanges Alexa credits.  this actually exists and they sell off some of the credits. The problem is that those are credits. They are not real visitors. They are not what you need.

Direct Hit failed as a search engine because it based a large portion of its algorithm on web traffic. Alexa ranking is highly inaccurate and easy to manipulate.

The ranking in alexa shows the total traffic being generated in your website. There are various steps involved in improving ranking in alexa. First of all it is suggested to download the alexa toolbar. Then the content, which is written, should include write-ups on alexa search engine. But a low ranking on Alexa does not indicate that the traffic is not being generated on Google, Yahoo and MSN search engines. Given the fact that Alexa ranking for a site is calculated on the basis of how many visitors with the Alexa toolbar installed have visited that particular site, the results can be inaccurate most of the time.

Microsoft Dynamics AX 20012 unsheld

Find information and tools to help you install, upgrade, use, customize, and maintain business management software: Microsoft Dynamics AX 2009. A business solution for all industries.


Send and recieve parameter string through args in axapta

1. Send
void clicked()
{
    Args  args = new Args();
    ;
    Args.parm("retrive hell");
    new MenuFunction(menuitemdisplaystr(Sunny_Param_String_Recieve), MenuItemType::Display).run(args);
}
2. Receive
public void init()
{
   // super();
    str paramString;
    Args args;
;
    super();
    args = new args();
    paramString = element.args().parm();
    info(strfmt("paramString = %1",paramString));
}

Friday, October 14, 2011

Create & Post Inventory Journal in AX 2009

Following is job which will create and post the Inventory Journal in ax 2009 :-

static void createMovJournal(Args _args)
{ InventJournalTable journalTable;
InventJournalTrans journalTrans;
InventJournalTableData journalTableData;
InventJournalTransData journalTransData;
InventTable inventTable;
InventDim inventDim;
Counter cnt;
InventJournalCheckPost journalCheckPost = new InventJournalCheckPost();
DialogButton dbtn;
;

journalTableData = JournalTableData::newTable(journalTable);
journalTransData = journalTableData.journalStatic().newJournalTransData(journalTrans,journalTableData);

// Init JournalTable

journalTable.clear();

journalTable.JournalId = journalTableData.nextJournalId();
journalTable.JournalType = InventJournalType::Movement;
journalTable.JournalNameId = journalTableData.journalStatic().standardJournalNameId(journalTable.JournalType);

journalTableData.initFromJournalName(journalTableData.journalStatic().findJournalName(journalTable.JournalNameId));

// Init JournalTrans
select firstonly inventTable;
for(cnt=1;cnt<10;cnt++)
{
journalTrans.clear();
journalTransData.initFromJournalTable();

journalTrans.TransDate = systemdateget() + 1 div 2;
journalTrans.ItemId ='1103';    //inventTable.ItemId;
journalTrans.Qty = 100;
journalTrans.CostAmount = 100;
journalTrans.LedgerAccountIdOffset='110170';

// Dimension details

inventDim.InventLocationId = '11';
journalTrans.InventDimId ='00000061_069'; //InventDim::findOrCreate(inventDim).inventDimId;

journalTransData.create();


}

journalTable.insert();

// Call the static method to post the journal
if(InventJournalCheckPost::newPostJournal(journalTable).validate())

if(box::yesNo("Do you want to Post Now?",DialogButton::No)==DialogButton::Yes)
{
InventJournalCheckPost::newPostJournal(journalTable).run();
}
else
{
 box::info("Not Posted");
}
info("done");

}

Dynamics AX technical consultant interview questions

I am going to share some frequent interview questions that generally asked for Dynamics AX Technical consultant position:
  1. How can we create primary key for a table?
  2. what precautions you need for overriding fetch() method for a report?
  3. Difference between OCC and PCC?
  4. How many types of MAP there in Dynamics AX? 
  5. What is cache lookup what is it used for?
  6. Difference between table and views?
  7. why we use dialog? and how to accomplished it?
  8. what are the different type of index?
  9. Difference b/w cascade + restricted and restricted delete actions?
  10. In which case delete_from and delete() have same result?
  11. Explain sales/purchase order processes in AX.
I will share more questions in my next post.

Enjoy DAX !!!

Service Accounts

Local System : Completely trusted account, more so than the administrator account. There is nothing on a single box that this account can not do and it has the right to access the network as the machine (this requires Active Directory and granting the machine account permissions to something)
        
Network Service : Limited service account that is meant to run standard least-privileged services. This account is far more limited than Local System (or even Administrator) but still has the right to access the network as the machine (see caveat above)

Local Service : A limited service account that is very similar to Network Service and meant to run standard least-privileged services. However unlike Network Service it has no ability to access the network as the machine.

X++ : lockWindowUpdate() vs. lock()/unlock()

There are two method pairs in X++, that are used throughout the application by everyone writing some processing on application forms. These are:


element.lock();
element.unLock();


and

element.lockWindowUpdate(true);
element.lockWindowUpdate(false);


Now, not that many people know the difference between the two methods, and only very few think about why and when should each of them be used.
I will try to describe the behavior of these methods and at the end give some recommendations on how to use them. I have done some kernel code reading (with help of kernel dev. Andy Stach, who I would like to mention here), so what I write below is more or less backed up by code.
If you disagree with some of the recommendations though, please share your experience in using these methods through comments for this post.

FormRun.lockWindowUpdate()

is basically a wrapper around the LockWindowUpdate Win32 function. What it does is pretty simple:
When a window is locked, all attempt to draw into it or its children fail. Instead of drawing, the window manager remembers which parts of the window the application tried to draw into, and when the window is unlocked, those areas are invalidated so that the application gets another WM_PAINT message, thereby bringing the screen contents back in sync with what the application believed to be on the screen.
Note, that according to MSDN, it should not be used for general purpose suppression of redraw operations, but only when dealing with drag&drop operations. This does not hold true for AX, where this method is used all over the place to prevent redraw of controls on the form.
Another interesting point is that only one window can be locked at the same time. So, any nested calls tolockWindowUpdate will be ignored, but when unlocking, only the outer-most unlock will actually invoke the Win32 counterpart. Now, I have not seen this used in X++, which is for the better.

FormRun.lock()

is internally invoking lockWindowUpdate to prevent the redraw of the window, and then also prevents the IntelliMorph control layout engine from running. This is commonly used in scenarios where control properties affecting control arrangement are being set in a loop, which provides a performance optimization as it avoids redundant arrange calls being processed. On the other hand, when calling FormRun.unlock, more work will need to be done, compared to usinglockWindowUpdate(false), where the control layout changes were actually processed by the layout engine, but simply not displayed.

So, based on my investigation, I would suggest to use the following recommendations when doing form development:

  • When formRun.resetSize() is used, specifically, when some controls become visible, increasing the form size, always use formRun.lock()/unlock(), otherwise the change in the size of the form might not get reflected on the screen correctly.
  • When changing multiple layout properties (Left, Width, etc.) on one or more controls, use lock/unlock
  • When you modify the properties that do not impact the layout of controls on the form, useformRun.lockWindowUpdate(), or, if there are only very few control properties being modified, do not lock the form window at all.
Skype Integration with Dynamics AX

1. Application Area
Skype® http://www.skype.com/ is a popular utility for IP telephony. Skype Integration add-on integrates Skype with standard Dynamics AX (Axapta) in the same way, like phone integration is made in Dynamics AX (Axapta) CRM Telemarketing.
The functionality includes 2 main parts:
  • Everywhere in the application for all “phone” fields user has a possibility to make calls using standard Dynamics AX (Axapta) phone integration functionality (via TAPI) or by Skype.
  • It’s assumed that user is ready to receive inbound calls by phone and Skype.
Therefore, Skype-integration functionality provides an alternative way to make phone calls from Dynamics AX (Axapta), while standard Dynamics AX (Axapta) can do it (e.g. CRM Telemarketing) using usual modem and phone line only.

2. Prerequisites

Skype software is to be installed as client.
SkypeOut account is to be registered in order to make outbound calls to normal phones using Skype.

3. Workflow

3.1. Outbound call

Skype provides 2 ways of communication:
  • “Skype to Skype” using Skype account. Currently this service is free.
  • “Skype to Phone” using SkypeOut account. You must pay for such calls, but the cost is much lower than normal international phone calls (see http://www.skype.com/).

Skype to Skype calls

A new string field “Skype account” is implemented in relevant forms. At the moment, it is implemented in e.g. “CRM Contact Persons” table/forms, and located in the “Contact info” field group. When user presses lookup-button (an icon with image of phone), Dynamics AX (Axapta) makes a call to this Skype account using Skype software, installed on the client’s machine.
Skype to phone calls (using SkypeOut)
In this case, we already have usual phone number in standard ‘Phone’ field, and the only question is to decide, if we would like to call using standard Dynamics AX (Axapta) telemarketing functionality, or should we start the call via Skype? This is specified by a new parameter “CRM / Setup / CRM Parameters / [tab] Telemarketing / [field group] Skype integration/ [field] Outbound phone call”, which can have the following 3 values: Use telephone / Use Skype / Ask user.
In the first 2 cases appropriate interface is used without additional questions. In the third case, every time before placing a call, the user will see a dialog window, where he can specify if he would like to use Skype, or use standard way to place a call.

Figure 1: CRM Parameters
When user clicks a button to place a call using SkypeOut, the following steps are performed:
  •  Skype window pops up starting a call.
  • A new form “Skype call” is opened in Dynamics AX (Axapta). This form presents the information about current call, and looks similar to standard FRM smmPhoneDialog.

Figure 2: Call using SkypeOut
Dynamics AX (Axapta) form displays the following information:
  •  Telephone number or Skype account.
  •  Start time of call.
  •  Call duration.
  •  Contact information.
  •  Activity description. Functionality allows saving the call as activity, like it’s implemented in standard Dynamics AX (Axapta) telemarketing.
 The form allows to:
  •  Finish Skype call.
  •  Reinitiate Skype call.

3.2. Inbound call

When user receives inbound call, the following steps are performed:
  • Skype window pops up making a call.
  • Form described above is opened in Dynamics AX (Axapta) presenting information about current inbound call. (CRM/ Parameters/ CRM Parameters/ Employee options/ tab: Telephony/ field group: “Skype integration”/ field: “Activate answers” must be checked). At the moment, this feature does not work under Dynamics AX (Axapta) 3.0 SP3, but works under Dynamics AX (Axapta) 3.0 SP2.

4. Conclusion

Skype Integration is a useful add-on to reduce the costs of international calls for sales department of the company (if SkypeOut account is utilized), and add one more communication tool to Dynamics AX (Axapta) Telemarketing.

Source :  http://csie-data.com/skype_integration

Spell Check in Dynamics AX

There is a class in AX that allows to perform spell checking. This class uses Microsoft Word spell checker to do the validation. So, in order to use it, Microsoft Word should be installed together with proofing language pack. Because of this requirement it is also important to consider where to run spell checking - on the server or on the client.

Example:
public static server void spellCheckerTest()
{
    SysSpellChecker sp = SysSpellChecker::newLanguageId('en-us');
    ;

    info(strfmt('%1', sp.checkSpelling("behavior")));
    info(strfmt('%1', sp.checkSpelling("behaviour")));
}


The output in infolog will be:
1
0