Workflow prerequisites
Before we begin installing and setting up Workflow, you will need to have administrator privileges on the machines in which you are installing Workflow on. The following prerequisites are required:- Internet Information Services (IIS) 7
- .NET Framework 2.0
- Business Connector
Workflow accounts setup
The Workflow system in Dynamics AX utilizes two accounts to function properly. If these accounts are not specified, workflow will still function; however, it is best practice to have dedicated accounts. One account is the service account. This account is responsible for the communication between Dynamics AX and the Workflow web service. The other account is the execution account. This account is responsible for executing Workflow tasks and processes. Similar to the Business Connector proxy account, these two accounts must be created with the following criteria:- The password must never expire
- It must not be interactive
- It must not be associated to any Dynamics AX users
- Log in to Dynamics AX 2009.
- Go to Administration | Setup | Security | System service accounts.

- In the System service accounts form, specify the Workflow System Account and the Workflow Execution Account. To specify the accounts that were created in the Active Directory, mark the Alias field radio boxes. When complete, click on the OK button.

Now that the Workflow accounts have been specified, the Dynamics AX Workflow system can utilize these accounts when communicating with the Workflow web service. It is also possible to create a user within Dynamics AX but not Active Directory, and use the Dynamics AX user accounts as the Workflow Service and Execution accounts. These accounts may appear as different users in Dynamics AX; however, these accounts will be impersonated by the AOS service account to the Workflow web service. This can make troubleshooting and connection auditing more difficult and therefore, it is not recommended.
Installing Workflow
Since Workflow consists of various parts that function together to create the Dynamics AX 2009 Workflow system, we will break down each part’s setup and complete each setup individually.Creating a website for Workflow
Before we can install the Workflow extended server component, we must have a website available to install upon. It is possible to use the default website that is on port 80. However, it is not recommended; therefore, a new website must be created. For information regarding how to create a website in IIS 7, refer to http://technet.microsoft.com/en-us/library/cc772350(WS.10).aspx.Installing the Workflow component
By now you should be accustomed to the process of installing the extended components for Dynamics AX. Installing Workflow is no different. The following steps will guide you through the process:- Run the Microsoft Dynamics AX Setup wizard to add new components. In the Add or modify components screen of the wizard, mark the Workflow checkbox, as shown in the following screenshot and then click on the Next button:

- In the following screen of the wizard, specify the password for the .NET Business Connector proxy account, and then click on the Next button:

- In the next section of the wizard, you will be prompted to tweak the Workflow service. In other words, you can select which website you want to install the Workflow service into. By default, the wizard will select the default website in IIS. However, it is recommended to install Workflow on its own dedicated site and port, you have the flexibility to do so. When you are satisfied with the settings on this page, click on the Next button.

- In the following screen you will be prompted to specify the AOS account for the Workflow service to grant permissions to. If there is more than one AOS and each AOS service account is different, provide the accounts for each AOS so that they can access the Workflow service.

- In the following step, you are prompted to complete the installation of the Workflow by clicking on the Finish button. You will want to restart IIS after the Workflow has been successfully installed. Therefore, leave the option checked at the bottom, as shown in the following screenshot:

- Once installed, you will be prompted with the final screen. The final screen will display the result of the installation of the Dynamics AX 2009 Workflow system. If the installation is successful, you will see a green box next to the installed component. Otherwise, if the box is orange or red, you should open the log file after you close the wizard by marking the checkbox at the bottom.

The Domain\user name field will automatically be populated if the Business Connector proxy user is specified in the Administration | Setup | Security | System service accounts form in the Business Connector Proxy group.
Enabling Workflow in Windows Server 2008 R2
In Windows Server 2008 R2, additional setup is required to enable the Workflow web service. The Workflow web service application pool must be enabled to run 32-bit applications. Otherwise, the Workflow service will fail. To set up the application pool to run 32-bit applications, perform the following steps:- Go to the IIS console and access the web server that you installed the Workflow web service on.
- Under <Your web server> | Application Pools, select the Dynamics AX Workflow application pool.

- Under Actions, go to Advanced Settings.... In the Advanced Settings window, set the Enable 32-Bit Applications property to True. When complete, click on the OK button to save the changes.

Setting up Workflow
Now that the Workflow service for Dynamics AX has been successfully installed, we can begin to configure it for use. Dynamics AX will not utilize the Workflow service after it has been installed. Therefore, in order to properly configure the Workflow system, we must do so within Dynamics AX 2009.Workflow configuration prerequisites
Before we begin configuring the Workflow system, we need to ensure that the following is set:- A dedicated Workflow batch group has been created
- An AOS is set up as a batch server
Creating a dedicated Workflow batch group
The following steps cover the process of verifying whether an AOS is a batch server and how to create a Workflow batch group:- To create a dedicated Workflow batch group, go to Administration | Setup | Batch groups.

- Create two new records in the Batch group form—one group that will execute Workflow commands and another that will process Workflow due date notifications.

Setting up the AOS as a batch server
Since Dynamics AX workflow uses a batch job to send workflow tasks to the web service in order to be processed in Dynamics AX, we need to ensure that there is at least one AOS that is designated as a batch server. Without the batch job, the Workflow web service would sit idle, waiting for a workflow request even though a user may have initiated a workflow task in Dynamics AX. In this section, we will cover the process of setting up an AOS as a batch server and ensuring that a Workflow’s batch group will be associated to a designated batch server.- To view and modify the current batch server set up on an AOS or group of AOSs, go to Administration | Setup | Server Configuration.

- Select the appropriate AOS that should run as the batch server and then click on the General tab and ensure that the Is Batch Server checkbox is marked.

- Go to the Batch server groups tab, and add the Workflow batch groups that we created.

- To specify the number of batch threads/processes that can run simultaneously and the time the batch processes can run, go to the Batch server schedule tab and provide the desired values. The following batch schedule is the default schedule and runs eight threads at any time of the day:

An AOS can be set up as a batch server and service users. However, depending on the performance and resource requirements for an implementation, it is recommended to have an AOS as a dedicated batch server.
Configuring Workflow
Now that we have an AOS that can run Workflows in a batch server, we must configure the batch processes. This section will guide you through the process of:- Configuring Dynamics AX to use the Workflow service
- Specifying Workflow parameters for notifications and general use
Running the Workflow infrastructure configuration wizard
The Workflow infrastructure configuration wizard allows you to quickly specify the Workflow web service address, Workflow batch groups, and specify when the Workflow batch jobs should run. It also validates the Workflow web service and ensures that it is accessible by the AOS. In this section, we will cover the process of running the wizard.- Go to the Administration module and in the Setup section, open the Workflow infrastructure configuration wizard. Once in the Workflow infrastructure configuration wizard form, click on the Next button, as shown in the following screenshot:

- In the next section of the wizard, you may specify the URL of the Workflow web service, which you created as described in Creating a website for Workflow section of this article. By default, this field will already be populated if you installed the Workflow service correctly. However, if you want to modify this field, you certainly have the option to do so. Be sure to click on the Validate button to confirm that the URL is accessible by Dynamics AX, as shown in the following screenshot:

- In the following section of the wizard, you will be able to see which batch group is designated to execute Workflow batch jobs. Verify that the appropriate batch group is assigned and then click on the Next button.

- In this section of the wizard, you can specify how many times you want the batch server to repeat the Workflow batch process. The lowest value you can enter is 1. The wizard will allow you to enter in 0; however, the batch system only accepts 1 as the lowest value. Once you have specified the appropriate value, click on the Next button.

- The next and final screen of the wizard displays a summary of all the settings that were specified. Click on the Finish button to apply these new settings and to make Dynamics AX start using the Workflow service.

Specifying Workflow settings
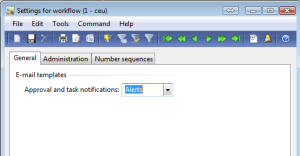
The Workflow infrastructure configuration wizard assists in setting up common Workflow settings that are shared between companies. However, company specific settings for Workflow must also be specified such as Number sequences. Additional settings can be customized but are not required, such as specifying custom e-mail templates or another Workflow web service URL. In this section, we will cover the process of specifying company-specific workflow settings.- Go to Basic | Setup | Settings for workflow. In the General tab, provide a custom template for Approval and task notifications. By default, no template is specified. In this case, a generic e-mail template will be used.

- In the Administration tab, verify that the correct Workflow web service is listed and verify that the system can access the service by clicking on the Validate button.

- In the Number sequences tab, ensure that Number sequences are mapped to the appropriate Reference.

If number sequences are not mapped, it may be because the number sequence wizard never ran. To run the number sequence wizard, go to Basic | Setup | Number sequences to load the Number sequences form. In the Number sequences form, run the wizard by clicking on the Wizard button. Dynamics AX will automatically check which number sequences need to be set up and associate number sequences to their reference.


