Saturday, March 9, 2013

Reproting Extension installation process tips and triks

Hi,

While installation of Reporting Extension of AX 2009 we are facing lots of Errors and Warning, so this post is for some tips and tricks regarding  installation of Reporting Extension as much as possible without of Errors and Warning.

1. Install all the prerequisite for reporting extensions.
2. Configure the Reporting services with the use of Reporting services configuration manager from configuration tool of SQL server 2008
3. Check the URL both reporting service url and reporting manager url from configuration services for accessing and proper running.
4. In the Dynamics AX 2009 >> Administration >> setup>> Reporting services .. Update the information regarding reporting services and create folder named DynamicsAX and click on the create button to create Datasource on the reporting manager URL.
5. Install reporting Extensions from AX 2009 setup
6. reset the IIS
7. Deploying  reports : Please do this activity with the login of BCPROXY user only.
Run report deployment tool from Dynamics AX 2009
8. Do not deploy all the reports at a time.
9 Deploy the reports one by one or select the some bunch of reports ( like all reports which start from letter B,C,D...or else )
10. Please do not deploy or select any reports which start with letter "S".
11. In Between this you might get warning with HTML code and reports failed to deploy at this time the general solution is to restart the Reporting services from Services.msc
12. And at the end you can deploy the all remaining reports.


----
Kishor

Friday, March 8, 2013

Report Deployment Errors in AX 2009

While deployment of reports (Reporting Extensions) in Ax 2009 the following error has been generated. 

Error:
Unable to connect to http://server:port/ReportServer/ReportService2005.asmx as specified in the config file for the report server at DriveName:\Program Files\Microsoft SQL Server\MSRS10.MSSQLSERVER\Reporting Services\ReportServer\RSReportServer.config. 

If this url is not correct please update the config file, otherwise make sure the report server is configured correctly.

Solution:

Go to Encryption Keys >> Delete Encrypted Content >> Delete 


------


Monday, March 4, 2013

Sharepoint services 3.0 Installation


Hardware and Software Requirements
Before you install WSS 3.0, make sure your computer has the recommended hardware and software. Your server computer must meet the following hardware and software requirements.

Hardware Requirements

- A dual-processor computer with processor speed 2.5 GHz or higher.
- A minimum of 1GB RAM; however 2GB RAM is recommended for improved performance.

Software Requirements
- Windows Server 2003 SP2 as the Operating System.
- The file system used by the OS must be NTFS. 
- The computer must be configured as a web server running Microsoft Internet Information Services (IIS) in IIS 6.0. 
- .NET framework v3.0 or higher which enables ASP.NET 2.0 and includes Windows Workflow Foundation 3.0.
- SQL Server 2005 Express Edition with Advanced Settings.
Installing WSS V3.0 (Basic Mode)
Prerequisites

- Windows Server 2003 Enterprise Edition with SP2 installed.
- .NET Framework 3.0.
- ASP.NET 2.0 installed and Web Services Extension enabled.
- SQL Server 2005 with Advanced Settings installed.

Installation Steps
  1. Double click the Sharepoint.exe, it will start the installation process.
  2. Choose the installation type you want to install (from Basic, Advanced), here Basic is chosen.
  3. The setup will now apply the updates to the installation.
  4. Click Next to continue with the installation.
  5. The setup will now configure with the installation settings and installation will complete. The following screens will guide you through the process.


    Figure 1.1 Basic Mode installation of WSS3.0


    Figure 1.2 Applying updates to the installation.


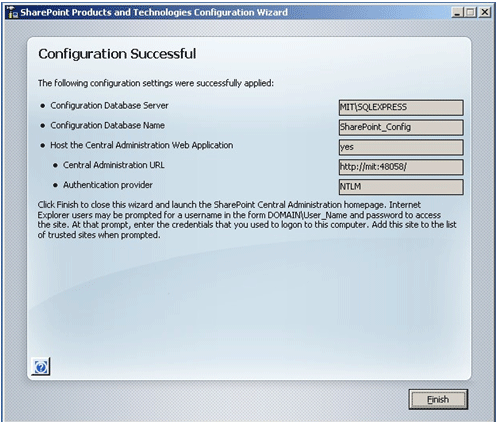
    Figure 1.3 Configuration Wizard in Basic Mode of installation.


    Figure 1.4 Configuration of WSS 3.0 is complete with default configuration.
    Installing WSS 3.0 (Advanced Mode)
    Prerequisites
    - Windows Server 2003 Enterprise Edition with SP2 installed.
    - .NET Framework 3.0.
    - ASP.NET 2.0 installed and Web Services Extension enabled.
    - SQL Server 2005 with Advanced Settings installed.

    Installation Steps
  1. Double click the Sharepoint.exe, it will start the installation process.
  2. Choose the installation type you want to install (from Basic, Advanced), here Advanced is chosen.


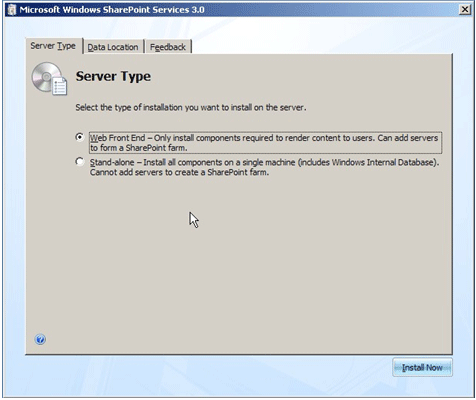
    Figure 1.5 Advanced Mode installation of WSS 3.0
     
  3. In Server type tab; there will be two option as Web Front End and Stand-Alone.
    a. Web-Front End: Only install components required to render content to users. Can add servers to form a SharePoint Farm.
    b. Stand-Alone: Install all components on a single machine (Includes Windows Internal Database). Cannot add servers to create a SharePoint Farm.
  4. Here in this installation Web Front End server type is chosen. As in this server type we can add servers to form a SharePoint Farm.
  5. In Data Location tab: choose the path of your search index files to be stored on the local hard drive.
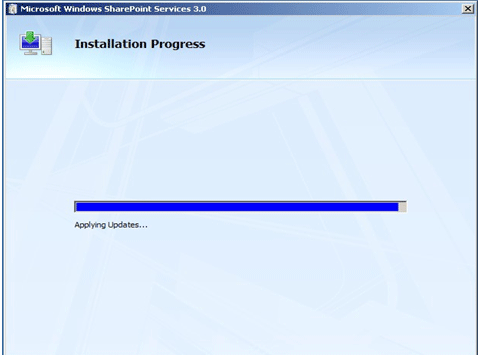
  6. Start the installation by clicking on Install Now.


    Figure 1.6 Selecting the Server type.


    Figure 1.7 Choosing the location where the Data files will be stored.


    Figure 1.8 Starting the installation and applying updates.
  7. After the installation is finished the configuration wizard will start; by checking the box prompted as "Run the SharePoint Products and Technology Configuration Wizard now". As shown below


    Figure 1.9 Finishing the installation & starting the configuration wizard.
    Configuring SharePoint Products and Technology
    Prerequisites
    - Name of database server and database where server farm configuration data will be stored.
    - Username and password for the database access account that will administer the server farm.

    Configuration Steps
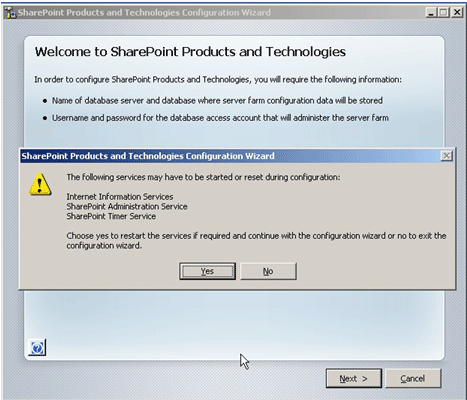
  1. The configuration wizard requires the following services to be started or reset during the configuration
    • Internet Information Services.
    • SharePoint Administration Services.
    • SharePoint Timer Service.
    By clicking Yes the services are started or reset and to proceed for the configuration wizard.
     
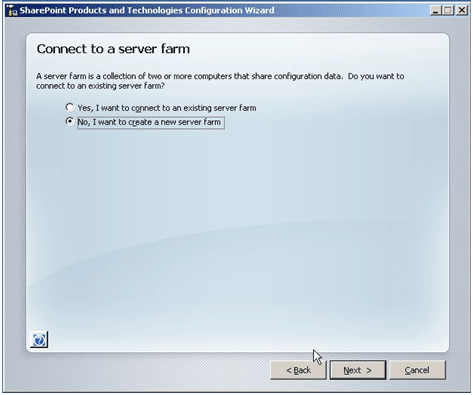
  2. The Next screen in the wizard asks for the following options
     
    • Connect to an existing server farm.
    • Create a new server farm.

    If there is a server farm you want to connect with to share configuration data; then connect to the server farm or create a new one.
    Here creating a new farm is selected, as there was no availability of server farms in the system.


    Figure 1.10 Requirements to proceed with configuration wizard.


    Figure 1.11 Connect to a Server Farm.
     
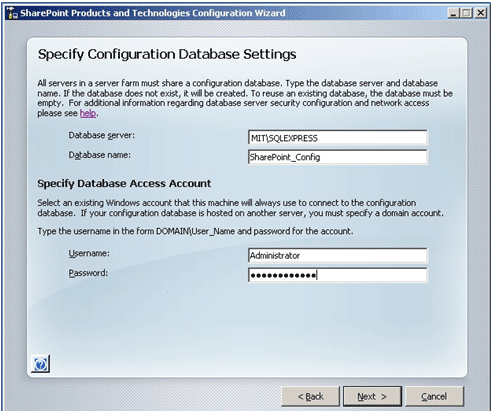
  3. The next screen will ask to specify the configuration for Database Settings. Such as the following details:
     
    • Database Server Name.
    • Database Name.
    • Database Access Account Username.
    • Database Access Account Password.

    The following figure describes the configuration for database settings.


    Figure 1.12 Configuring Database Settings.
     
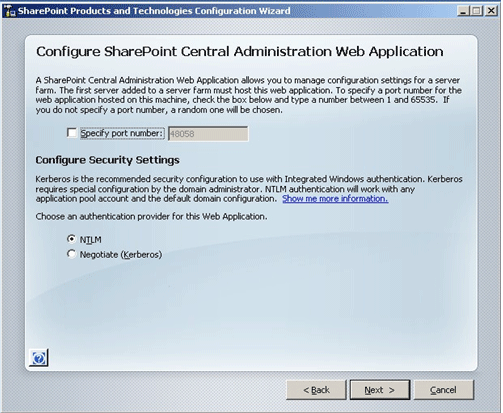
  4. The next screen configures SharePoint Central Administration Web Application. It asks for the following requirements to specify such as:
     
    • Specifying a port number for the web application hosted on this machine; the port number can be a number in between 1 to 65535. Otherwise system will take a random port number.
    • Choosing an authentication provider for this Web application.
      -> NTLM: NT LAN Manager is a Microsoft authentication protocol.
      -> Kerberos: It is a computer network authentication protocol, which allows individuals communicating over a non-secure network to prove their identity to one another in a secure manner.

    Here the NTLM authentication is chosen.


    Figure 1.13 Configure SharePoint Central Administration Web Application.
     
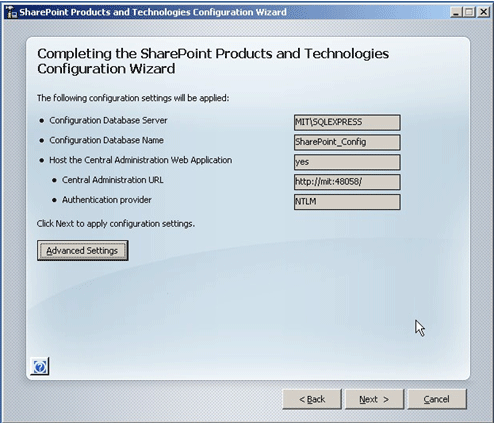
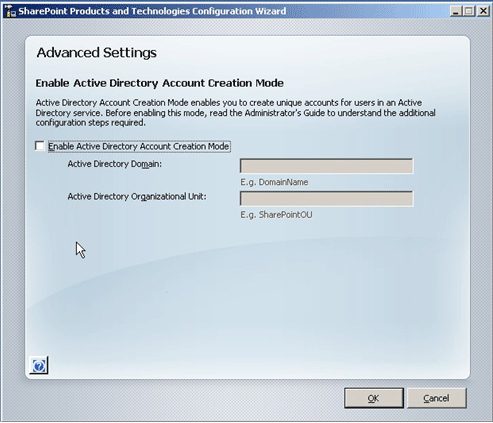
  5. Complete the wizard by clicking Next or we can click Advanced Settings to enable the Active Directory creation Mode by providing Active Directory Domain and Organizational Unit.
Active Directory: It is a hierarchical collection of network resources that can contain users, computers, printers, and other Active Directories. Active Directory Services (ADS) allow administrators to handle and maintain all network resources from a single location. 


Figure 1.14 Completing the configuration wizard.


Figure 1.15 Advanced Settings for Enabling Active Directory Account.


Figure 1.16 Click Finish to complete the configuration.
Summary
Basic Installation
In Basic installation mode we are provided with fewer options while installing. The setup continues with the default settings and configures the same.

Advanced Installation

In the case of advanced installation we are provided with ample options while installing as well as configuring. 
Such as:
  1. Server type
    • Web Front-end
    • Standalone
  2. Resetting or restarting of required services.
  3. Connecting to the Server Farm
    • Connect to the existing Server Farm.
    • Creating a new Server Farm
  4. Specifying Configuration Database Settings
    • Database Server
    • Database Name
  5. Specify Database Access Account
    • Username
    • Password
  6. Configuring SharePoint Central Administration Web Application
    • Specify Port Number
  7. Configure security Settings
    • NTLM security
    • Kerberos security
  8. Advanced Settings for Enabling Active Directory Account Creation Mode
    • Active Directory Domain
    • Active Directory Organizational Unit
The difference between the two modes of installation depends on the user needs. If the user needs to install and wants to configure later Basic Mode is chosen. If the user needs to install as well as configure in more detail then advanced mode is chosen.

The basic installation installs the SQL Server 2005 Everywhere Edition and creates a web application at port 80 based on the team site template. But advanced installation creates no default web application or installs the SQL Server. Advanced installation installs only the front-end components that are required to render the website. It assumes that SQL Server 2005 is already installed

Wednesday, February 27, 2013

Error while installing Microsoft Dynamics AX Reporting Extensions and Role Centers and Enterprise Portal


Issues:

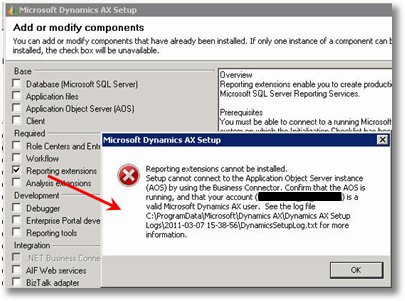
Reporting extensions cannot be installed and display the below error message, Event Log & Setup Log:
Image
Error Message :
Role centers and Enterprise Portal cannot be installed. Setup cannot connect to the Application Object Server Instance (AOS) by using Business Connector.
Generated Event log:
Log Name: Application
Source: Microsoft.Dynamics.Framework.BusinessConnector
Event ID: 1000
Description: Session log on for Microsoft Dynamics failed Microsoft.Dynamics.Framework.BusinessConnector.Session.Exceptions.FatalSessionException
Dynamics Adapter Logon failed.
Setup Log:
Property RemoveComponents set to: ’0′
Property BypassWarnings set to: ’0′
Entering method GetBusinessConnectorProxyAccount
An error has occured while Setup was establishing a connection through Business Connector. Error: No .NET Business Connector session could be found.
Leaving method GetBusinessConnectorProxyAccount
An error has occured while Setup was establishing a connection through Business Connector. Error: No .NET Business Connector session could be found.
Microsoft.Dynamics.Framework.Deployment.Web.EPWebException
Solution:
1. Change the client configuration file to run on Business connector.
2. Check if the client configuration file is pointing to required Server Name & TCP/IP Port, if not modify and apply the settings.
3. Start the Microsoft Dynamics AX Setup wizard and install the selected components “Reporting extensions” and Click Next.
4. After the installation is complete, you must deploy the default reports that are included with Microsoft Dynamics AX.
-------
What i did ...
1. I have created the business connector configuration for AOS ( which m using for installation EP and Reporting Extension.
2. In the client configuration assign the AOS name to the local client.
-----------------------------------------------------------

Source : http://dynamicsaxsolutions.wordpress.com/

Wednesday, February 13, 2013

Workflow installation and configuration in AX 2009

Workflow prerequisites

Before we begin installing and setting up Workflow, you will need to have administrator privileges on the machines in which you are installing Workflow on. The following prerequisites are required:
  • Internet Information Services (IIS) 7
  • .NET Framework 2.0
  • Business Connector
The Workflow component for Dynamics AX utilizes the Business Connector to communicate directly to Dynamics AX from its web service. Although it depends on the number of users and computing resources available, it is best practice to implement the Workflow web service application on its own server.

Workflow accounts setup

The Workflow system in Dynamics AX utilizes two accounts to function properly. If these accounts are not specified, workflow will still function; however, it is best practice to have dedicated accounts. One account is the service account. This account is responsible for the communication between Dynamics AX and the Workflow web service. The other account is the execution account. This account is responsible for executing Workflow tasks and processes. Similar to the Business Connector proxy account, these two accounts must be created with the following criteria:
  • The password must never expire
  • It must not be interactive
  • It must not be associated to any Dynamics AX users
Once the Workflow accounts have been created, the next process is to ensure that the Dynamics AX Workflow system will use the accounts. To do this, perform the following steps:
  1. Log in to Dynamics AX 2009.
  2. Go to Administration | Setup | Security | System service accounts.
    Microsoft Dynamics AX 2009 Administration
  3. In the System service accounts form, specify the Workflow System Account and the Workflow Execution Account. To specify the accounts that were created in the Active Directory, mark the Alias field radio boxes. When complete, click on the OK button.
    Microsoft Dynamics AX 2009 Administration
Now that the Workflow accounts have been specified, the Dynamics AX Workflow system can utilize these accounts when communicating with the Workflow web service. It is also possible to create a user within Dynamics AX but not Active Directory, and use the Dynamics AX user accounts as the Workflow Service and Execution accounts. These accounts may appear as different users in Dynamics AX; however, these accounts will be impersonated by the AOS service account to the Workflow web service. This can make troubleshooting and connection auditing more difficult and therefore, it is not recommended.

Installing Workflow

Since Workflow consists of various parts that function together to create the Dynamics AX 2009 Workflow system, we will break down each part’s setup and complete each setup individually.

Creating a website for Workflow

Before we can install the Workflow extended server component, we must have a website available to install upon. It is possible to use the default website that is on port 80. However, it is not recommended; therefore, a new website must be created. For information regarding how to create a website in IIS 7, refer to http://technet.microsoft.com/en-us/library/cc772350(WS.10).aspx.

Installing the Workflow component

By now you should be accustomed to the process of installing the extended components for Dynamics AX. Installing Workflow is no different. The following steps will guide you through the process:
  1. Run the Microsoft Dynamics AX Setup wizard to add new components. In the Add or modify components screen of the wizard, mark the Workflow checkbox, as shown in the following screenshot and then click on the Next button:
    Microsoft Dynamics AX 2009 Administration
  2. In the following screen of the wizard, specify the password for the .NET Business Connector proxy account, and then click on the Next button:
    Microsoft Dynamics AX 2009 Administration
  3. The Domain\user name field will automatically be populated if the Business Connector proxy user is specified in the Administration | Setup | Security | System service accounts form in the Business Connector Proxy group.
  4. In the next section of the wizard, you will be prompted to tweak the Workflow service. In other words, you can select which website you want to install the Workflow service into. By default, the wizard will select the default website in IIS. However, it is recommended to install Workflow on its own dedicated site and port, you have the flexibility to do so. When you are satisfied with the settings on this page, click on the Next button.
    Microsoft Dynamics AX 2009 Administration
  5. In the following screen you will be prompted to specify the AOS account for the Workflow service to grant permissions to. If there is more than one AOS and each AOS service account is different, provide the accounts for each AOS so that they can access the Workflow service.
    Microsoft Dynamics AX 2009 Administration
  6. In the following step, you are prompted to complete the installation of the Workflow by clicking on the Finish button. You will want to restart IIS after the Workflow has been successfully installed. Therefore, leave the option checked at the bottom, as shown in the following screenshot:
    Microsoft Dynamics AX 2009 Administration
  7. Once installed, you will be prompted with the final screen. The final screen will display the result of the installation of the Dynamics AX 2009 Workflow system. If the installation is successful, you will see a green box next to the installed component. Otherwise, if the box is orange or red, you should open the log file after you close the wizard by marking the checkbox at the bottom.
    Microsoft Dynamics AX 2009 Administration

Enabling Workflow in Windows Server 2008 R2

In Windows Server 2008 R2, additional setup is required to enable the Workflow web service. The Workflow web service application pool must be enabled to run 32-bit applications. Otherwise, the Workflow service will fail. To set up the application pool to run 32-bit applications, perform the following steps:
  1. Go to the IIS console and access the web server that you installed the Workflow web service on.
  2. Under &ltYour web server&gt | Application Pools, select the Dynamics AX Workflow application pool.
    Microsoft Dynamics AX 2009 Administration
  3. Under Actions, go to Advanced Settings.... In the Advanced Settings window, set the Enable 32-Bit Applications property to True. When complete, click on the OK button to save the changes.
    Microsoft Dynamics AX 2009 Administration
After performing these steps, the Workflow web service can then be used by Dynamics AX to process Workflows. Next, we will set up Dynamics AX to use the Workflow web service.

Setting up Workflow

Now that the Workflow service for Dynamics AX has been successfully installed, we can begin to configure it for use. Dynamics AX will not utilize the Workflow service after it has been installed. Therefore, in order to properly configure the Workflow system, we must do so within Dynamics AX 2009.

Workflow configuration prerequisites

Before we begin configuring the Workflow system, we need to ensure that the following is set:
  • A dedicated Workflow batch group has been created
  • An AOS is set up as a batch server
Creating a dedicated batch group is not required but recommended since, there is no batch group dedicated for Workflow. Since Workflow uses batch jobs to generate notifications and run Workflow processes, a batch server is required.

Creating a dedicated Workflow batch group

The following steps cover the process of verifying whether an AOS is a batch server and how to create a Workflow batch group:
  1. To create a dedicated Workflow batch group, go to Administration | Setup | Batch groups.
    Microsoft Dynamics AX 2009 Administration
  2. Create two new records in the Batch group form—one group that will execute Workflow commands and another that will process Workflow due date notifications.
    Microsoft Dynamics AX 2009 Administration

Setting up the AOS as a batch server

Since Dynamics AX workflow uses a batch job to send workflow tasks to the web service in order to be processed in Dynamics AX, we need to ensure that there is at least one AOS that is designated as a batch server. Without the batch job, the Workflow web service would sit idle, waiting for a workflow request even though a user may have initiated a workflow task in Dynamics AX. In this section, we will cover the process of setting up an AOS as a batch server and ensuring that a Workflow’s batch group will be associated to a designated batch server.
  1. To view and modify the current batch server set up on an AOS or group of AOSs, go to Administration | Setup | Server Configuration.
    Microsoft Dynamics AX 2009 Administration
  2. An AOS can be set up as a batch server and service users. However, depending on the performance and resource requirements for an implementation, it is recommended to have an AOS as a dedicated batch server.
  3. Select the appropriate AOS that should run as the batch server and then click on the General tab and ensure that the Is Batch Server checkbox is marked.
    Microsoft Dynamics AX 2009 Administration
  4. Go to the Batch server groups tab, and add the Workflow batch groups that we created.
    Microsoft Dynamics AX 2009 Administration
  5. To specify the number of batch threads/processes that can run simultaneously and the time the batch processes can run, go to the Batch server schedule tab and provide the desired values. The following batch schedule is the default schedule and runs eight threads at any time of the day:
    Microsoft Dynamics AX 2009 Administration

Configuring Workflow

Now that we have an AOS that can run Workflows in a batch server, we must configure the batch processes. This section will guide you through the process of:
  • Configuring Dynamics AX to use the Workflow service
  • Specifying Workflow parameters for notifications and general use

Running the Workflow infrastructure configuration wizard

The Workflow infrastructure configuration wizard allows you to quickly specify the Workflow web service address, Workflow batch groups, and specify when the Workflow batch jobs should run. It also validates the Workflow web service and ensures that it is accessible by the AOS. In this section, we will cover the process of running the wizard.
  1. Go to the Administration module and in the Setup section, open the Workflow infrastructure configuration wizard. Once in the Workflow infrastructure configuration wizard form, click on the Next button, as shown in the following screenshot:
    Microsoft Dynamics AX 2009 Administration
  2. In the next section of the wizard, you may specify the URL of the Workflow web service, which you created as described in Creating a website for Workflow section of this article. By default, this field will already be populated if you installed the Workflow service correctly. However, if you want to modify this field, you certainly have the option to do so. Be sure to click on the Validate button to confirm that the URL is accessible by Dynamics AX, as shown in the following screenshot:
    Microsoft Dynamics AX 2009 Administration
  3. In the following section of the wizard, you will be able to see which batch group is designated to execute Workflow batch jobs. Verify that the appropriate batch group is assigned and then click on the Next button.
    Microsoft Dynamics AX 2009 Administration
  4. In this section of the wizard, you can specify how many times you want the batch server to repeat the Workflow batch process. The lowest value you can enter is 1. The wizard will allow you to enter in 0; however, the batch system only accepts 1 as the lowest value. Once you have specified the appropriate value, click on the Next button.
    Microsoft Dynamics AX 2009 Administration
  5. The next and final screen of the wizard displays a summary of all the settings that were specified. Click on the Finish button to apply these new settings and to make Dynamics AX start using the Workflow service.
    Microsoft Dynamics AX 2009 Administration

Specifying Workflow settings

The Workflow infrastructure configuration wizard assists in setting up common Workflow settings that are shared between companies. However, company specific settings for Workflow must also be specified such as Number sequences. Additional settings can be customized but are not required, such as specifying custom e-mail templates or another Workflow web service URL. In this section, we will cover the process of specifying company-specific workflow settings.
  1. Go to Basic | Setup | Settings for workflow. In the General tab, provide a custom template for Approval and task notifications. By default, no template is specified. In this case, a generic e-mail template will be used.
    Microsoft Dynamics AX 2009 Administration
  2. In the Administration tab, verify that the correct Workflow web service is listed and verify that the system can access the service by clicking on the Validate button.
    Microsoft Dynamics AX 2009 Administration
  3. In the Number sequences tab, ensure that Number sequences are mapped to the appropriate Reference.
    Microsoft Dynamics AX 2009 Administration
If number sequences are not mapped, it may be because the number sequence wizard never ran. To run the number sequence wizard, go to Basic | Setup | Number sequences to load the Number sequences form. In the Number sequences form, run the wizard by clicking on the Wizard button. Dynamics AX will automatically check which number sequences need to be set up and associate number sequences to their reference.