Wednesday, November 2, 2011

Send workflow notification as email

In AX2009, we can email the workflow notifications. The following steps will show you how to set this up:
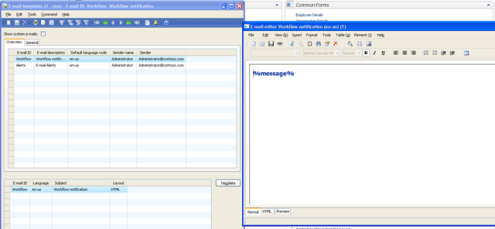
1. Create an email template for workflow.
Go to Basic –> Setup –> Email Templates. Create a new email template for workflow notification.
image
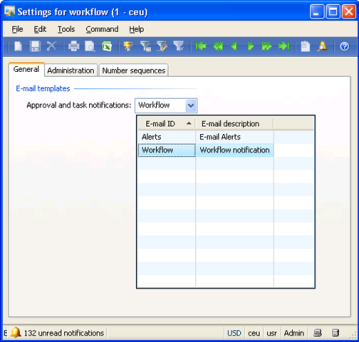
2. Set workflow to use the template that is created from step 1.
Go to Basic –> Setup –> Settings for workflow. Select the email template on the General tab.
image
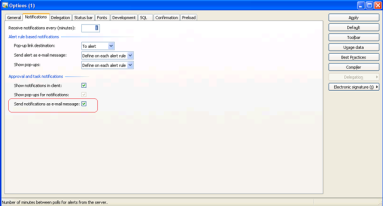
3. Enable “Send notifications as e-mail message” for the user.
Tools –> Options.
image

Tuesday, November 1, 2011

How to show or hide query ranges on dialogs in Dynamics ax

Sometimes, we create dialogs which have a query associated with them. We use this query to filter records and show us some data. Often, associating such queries with dialogs adds ranges to the dialogs. But do we really need these ranges always? In this post, let us look at one of the reason why ranges may get added and how to hide them.

Let us create a simple Query as shown in the figure below. Nothing fancy about it. Just SalesTable and SalesLine joined.

Now we will create a dialog, set the dialog's query with the query we created above and run it.

When the dialog opens, this is how it looks.

Notice now that there are two SalesId ranges. These come from SalesTable and SalesLine respectively.

The logic to add the range here is that the first active index on the tables are displayed. Take a look at both SalesTable and SalesLine.

On SalesTable, the first index is SalesIdx and on SalesLine, the first index is SalesLineIdx.

Before we move further, some of you may question that SalesLineIdx has threee fields - SalesId, LineNum & RecId. So why is only SalesId shown as a range. Well, the answer is that for all child datasources, only the first range is shown.

Now back to the topic, I want to hide the SalesLine's SalesId range on the dialog. How can I do that?

The answer is to override the showIndexFields method on the dialog and return false. Let us try that.

1.public boolean showIndexFields(tableId id)
2.{
3.    boolean ret;
4.  
5.    ret = true;
6.  
7.    return ret;
8.}
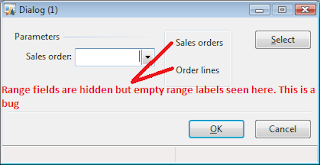
Well, the fields have been hidden but the labels are still showing. This is a bug in the RunBaseDialogModify class which hasn't been fixed yet even in the latest roll up. If you are interested in fixing this, you will have to move the code on lines 26 & 27 in \Classes\RunBaseDialogModify\addQueryDatasource() inside the condition on line 75.

Coming back to our original requirement, I just want to hide the range for the SalesLine table. If you look closely at the showIndexFields() method's signature, it passes a tableId value. We can use this value to decide which tables to show the ranges for and which to disallow.

01.public boolean showIndexFields(tableId id)
02.{
03.    boolean ret = true;
04.      
05.    switch(id)
06.    {
07.        case tableNum(SalesLine):
08.            ret = false;
09.            break;
10.    }
11.  
12.    return ret;
13.}

As you can see from the below image now, only the range on SalesTable is visible now. The SalesLine range's label is still visible which is due to the bug in code I mentioned above.

In this post, we learnt how we can hide the ranges of certain tables by overriding the showIndexFields() methods.

You can download the project I have used in this post from here

Table override methods in AX

In this post, I will add the Override methods available to the table Airline.  Tables in AX have 29 methods that can be overridden. Open the shared project Flight_Stats and expands the nodes Data Dictionary / Tables / Airline / Methods. Right-click on the node Methods and select Override Method. Then click on the first override method aosValidateDelete.
20110808_P01_01_Table_Override_Method
Inside the method aosValidateDelete, I added the line info(‘aosValidateDelete’); in order to study when this particular method is triggered.
20110808_P01_02_Method_aosValidateDelete
Similarly, I added the below mentioned 29 override methods to the table Airline. These override methods are available on any given AX table:
  1. aosValidateDelete
  2. aosValidateInsert
  3. aosValidateRead
  4. aosValidateUpdate
  5. caption
  6. clear
  7. delete
  8. equal
  9. getPresenceFieldData
  10. helpField
  11. initValue
  12. initValue
  13. isFormDataSource
  14. merge
  15. modifiedField
  16. new
  17. postLoad
  18. renamePrimaryKey
  19. reread
  20. toolTipField
  21. toolTipRecord
  22. toString
  23. update
  24. validateDelete
  25. validateField
  26. validateWrite
  27. wait
  28. write
  29. xml
    I added the info statement to all the above methods similar to how I added it to the method aosValidateDelete. Except the following methods required some additional changes:
new method required the lone semicolon to avoid the Syntax error.
20110808_P01_04_Airline_new
20110808_P01_05_Airline_new_Error
toString method was throwing the error Super() not allowed here. Hence, that line had to be commented out. Also, added the lone semi colon to avoid the Syntax error.
20110808_P01_06_Airline_toString
20110808_P01_07_Airline_toString_Error
wait method was throwing the error Super() not allowed here. Hence, that line had to be commented out. Also, added the lone semi colon to avoid the Syntax error.
20110808_P01_08_Airline_wait
20110808_P01_09_Airline_wait_Error
Now that I have added these info statements, I am planning to study how these methods work using Table browser.

Creating a table in AX

Right-click on Tables under Data Dictionary node and select New / Table.
20110805_P01_01_New_Table
The new table object will be created with the name Table1. Right-click on the newly created table object Table1 and select the option Open or you can press Ctrl + O.
20110805_P01_02_Open_Table
You should get the error message Cannot select a record in Table1 (Table1). The SQL database has issued an error.
20110805_P01_03_Open_Table_Error
The reason for the error is because the object has been created in AX but has not been created in the SQL Server database. Let’s use the SQL Server Management Studio (SSMS) to look into the list of tables in the AX database. I have shown here only the tables between alphabets S and T. You can notice that there is not object named Table1.
20110805_P01_04_Table1_Does_Not_Exist
Let’s save the table in the AOT. To save the the object in AX, right-click on the object Table1 and select the option Save or press Ctrl + S.
20110805_P01_05_Save_Table1
Now, if we go back to SSMS you can see that the object Table1 has now been created in the AX database.
20110805_P01_06_Table1_Now_Exists
If we expand the newly created table Table1 in the SSMS, we can see the following nodes namely Columns, Keys, Constraints, Triggers, Indexes and Statistics.
  • AX creates new tables with three fields namely DataAreaId, RecVersion and RecId.
  • DataAreaId column will store the company code to which a record belongs to.
  • RecVersion column contains the version of the record in the table.
  •  RecId column contains the unique identification number of the record.
  • The constraint that begins with CK is the check constraint to make sure that the RecId doesn’t contain the value zero.
  • First default constraint is created to store the value dat in the field DataAreaId, which is then actually updated with the appropriate company account id value in which the record is created.
  • Second default constraint is created to store the value 1 in the field RecVersion. The value 1 is always stored in the field RecVersion whenever a new record is created in the tables. If the record in the table is updated, the value in the field RecVersion is replaced with a version number. We will get to learn about that as we proceed with the Flight Stats application development.
  • In addition to the constraints, a unique non-clustered index containing the fields DataAreaId and RecId is created to keep the values in these fields unique.
20110805_P01_07_New_Table_Defintion
Let’s go back to the AX application and open the newly created table Table1 again. You should see the Table browser as shown below with the three automatically created columns that we just discussed earlier. Of course, the table is empty!
20110805_P01_08_Table1_Using_Table_Browser
We need to rename this table because it should be called Airline and not Table1. To rename the table, right-click on it and select Rename option.
20110805_P01_09_Table1_Rename
Rename the table to Airline.
20110805_P01_10_New_Table_Airline
Once the table is renamed and saved, the table in the SQL Server database will be synchronized.
20110805_P01_11_New_Table_Airline_In_Database

Creating a new label file in AX

We will use the Label file wizard available in AX to create the new label file. Open the Dynamics AX client and then navigate to Microsoft Dynamics AX / Tools / Development tools / Label / Label file Wizard.
20110804_P01_01_Label_File_Wizard
On the Label file Wizard’s Add label file step, check the Create new label file ID checkbox. In AX, there are in-built label ids like sys, gls that are named after the layers. However, for the Flight Stats application, I would like to create a label id of my own. That’s the reason I would like to create a new label id. I don’t want to create a new language. So, I will leave the Create new label language unchecked. Click Next.
20110804_P01_02_Add_Label_File
On the Label file Wizard’s New label file id step, enter the value FLS in the label file ID. This is the label id that would denote the FLight Stats application labels. Also, read the note on this wizard about the abbreviations that cannot be used as label id because those ids are reserved for AX. Click Next.
20110804_P01_03_New_Label_File_ID
On the Label file Wizard’s Create the label files step, click Finish.
20110804_P01_04_Create_The_Label_Files
Now, let’s go to the application files folder to see what files were created. In my case, the application files are installed in the path E:\Program Files\Microsoft Dynamics AX\50\Application\Appl\DEVDAX50Base. In the folder, search for axFLS*.ald and you will see 41 files created one for each of the 41 languages currently supported by Dynamics AX 2009. Label files are named as mentioned below:
  1. ax is the prefix used by the application files.
  2. FLS stands for the label file id that we provided in the wizard.
  3. Label id is then followed by language culture codes like en-us, en-gb, es or fr-ca and so on.
  4. The label files have the extension .ald It stands for Application Label Data.
20110804_P01_05_Label_Files_In_Application_Files_Folder
The label files can be opened and viewed in a text editor. Let’s see what is inside the newly created label file in language en-us. Since the extension .ald will not be recognized by Windows, we need to first associated it with a program to open the file. Right-click on the axFLSen-us.ald file and select Open.
20110804_P01_06_Open_Label_File_en_us
On the dialog that is prompts you with What do you want to do? message, check the option Select a program from a list of installed programs. Click OK.
20110804_P01_07_Open_With
On the Open with dialog, if you see the Notepad under Recommended Programs then select it. If you don’t see any programs under Recommended Programs, click on the expand icon and then you should see the Notepad program. In future, if you would always like to open the label files in Notepad then select the option Always use the selected program to open this kind of file. Click OK.
20110804_P01_08_Open_With_Program
The label file will now be opened in the Notepad. There are four parts to this label file.
  1. The language of the label file. Here in this case, we have opened the file axFLSen-us.ald. That means we are viewing only label contents in en-us language (English – United States). So, each language translation is stored in a file of its own.
  2. @FLS0 denotes the label id. It uses auto incremental value. So, the next labels will have the ids @FLS1, @FLS2 and so on.
  3. The label id is then followed by a space and then the label text. Here in this case the label text Label files created on 4/9/2011 is auto generated by AX.
  4. On the next line, the text By user Siva denotes the description about the label. This gives an additional information about the usage of the label but it is not part of the text. Also this is optional.
20110804_P01_09_New_Label_File_Content
So, we have a new label file. Let’s create a new label manually. Go back to the Dynamics AX client and then navigate to Microsoft Dynamics AX / Tools / Development tools / Label / Label editor.
20110804_P01_10_Label_Editor
Let’s first search for the existing label. We have only one existing label at this moment, which is @FLS0. Enter the text @FLS0 in the Find what textbox and click Find now or press Enter. Label editor will list the matching label. You can also see 4 columns namely Label ID, Language, Label and Description. These are the four parts that we discussed earlier.
20110804_P01_11_Label_Editor_Search_@FLS0
Click on the Setup tab and you will notice that the Label file ID dropdown is pre-selected to FLS because that is the only custom label id currently available. You will also see 40 other languages listed in the bottom section. Including English – United States, there are 41 languages. The default language will not be listed in this section. The default language is the own that is shown in the In the language dropdown on the Label tab. Here in this case, the default selected language is en-us.
20110804_P01_12_Label_Editor_Setup_Languages
Here is the list of all the 40 languages.
20110804_P01_13_All_Languages
Now, let’s create a new label. To create a new label, switch to the Label tab. Click on the New icon or press Ctrl + N. You should see a new row with just language column pre-populated with the default language (here in this case en-us)
20110804_P01_14_New_FLS_Label
Under the column Label, enter the text Flight Stats. I am going to ignore the Description column.
20110804_P01_15_New_FLS_Label_Text_Entered
Click Save icon or press Ctrl + S. You should now see the label id @FLS1 assigned to the new label text.
20110804_P01_16_@FLS1_Created
Let’s make a minor change to the label by changing the upper case S to lower case s. I am doing this to showcase another feature related to the labels. Click Save icon or press Ctrl + S to save the changes.
20110804_P01_17_@FLS1_Modified
There is another feature called Label log. As the name suggests, this captures the changes made to the labels. You can click on the Label log button that appears on the Label editor for a given label or you can navigate to Microsoft Dynamics AX / Tools / Development tools / Label / Label log.
20110804_P01_18_Label_Log
Label log will show all the label changes that have occurred. It could Inserted, Modified or Deleted. Here in the screenshot, you can see that I created label id @FLS1 and also modified it. Also, I created another label id @FLS2 and deleted it.  This will help in keeping tracking of the labels that you think have suddenly disappeared!
20110804_P01_19_Label_Log_Records
20110804_P01_20_Label_Log_General_Tab
Now, I have created a new label file for Flight Stats application. In the next post, I will discuss about creating new objects.
Application object layers and patch layers in AX

any code changes made on an AX object will reflect on all companies unless we have a condition that checks for the company in which your are currently accessing. The code separation that I am planning is to customize or create new AX objects only in the usr layer. It is a separation that AX offers so we can override the logic in the lower layer. However, the Flight Stats project will most likely create lots of new objects and will modify only very few standard objects.
One easy way to see all the layers available in AX is to go to the AX Configuration Utility. To access the utility, click on the Windows Start button, go to Control Panel / Administrative Tools / Microsoft Dynamics AX 2009 Configuration. If you see all the fields on the client configuration disabled, click on the Manage button and select Create configuration… Provide a name for the configuration. I gave the name Sample. Click on the Developer tab and you will see all the AX layers in the Application object layer to open dropdown. You can delete the configuration by clicking on the Manage button and then select the option Delete configuration.
20110802_P01_01_AX_Layers
Here are the list of layers in AX. Non-bold layers are the patch layers.
  1. sys
  2. syp
  3. gls
  4. glp
  5. hfx
  6. sl1
  7. sl2
  8. sl3
  9. bus
  10. bup
  11. var
  12. vap
  13. cus
  14. cup
  15. usr
  16. usp
    Each layer has its own significance. You can read more about these layers in MSDN website:
Application Object Layers
Application Object Patch Layers
I have decided to use the usr layer to do Flight Stats application coding. usr, usp, cus and cup are the layers that I have currently access to. So, one day if I decide to delete all the code in a particular layer (say usr). All I have to do is navigate to the path where the application files are installed. In my case, they are installed in the path E:\Program Files\Microsoft Dynamics AX\50\Application\Appl\DEVDAX50Base. Then, I need to search for the files with extension *.aod and simply delete the axusr.aod file**. The AOS service should be stopped in order to delete any application file. The file extension aod stands for Application Object Data. There will be one aod file for each of the layer that has been customized in addition to the standard aod files that come out of the box. In the below screenshot, you don’t see any files like axcup.aod, axcus.aod or axusp.aod because I didn’t customize AX objects in any of these layers. Ok, I am not going to delete any files now! I was just showing how to get rid of all the customizations from any given layer in an easier manner.
NOTE: ** Please be careful and always take backups whenever you are deleting important files. By the way, you are on your own if you delete any aod file. So, please make sure that you understand the full consequences of what you are doing.
20110802_P01_02_Applicartion_Files
So, the Flight Stats project code will reside in usr layer. In the next post, I will discuss about creating a shared project to group all the objects that are created or modified as part of Flight Stats application.