Thursday, December 5, 2013

Enable/Disable Fact boxes, Preview Panes in AX2012 UX

In Microsoft Dynamics AX 2012, if you want to disable factboxes/preview panes across application then you can do so.
It's not recommended to do this activity but this will help in troubleshooting performance issues assoicated with opening forms in ax2012 by controlling 'Timeout' parameter as below.

Go to ->System Administration->Setup->Client performance options 

Visit  Ax2012-client-performance-options for detailed explaination by Ax performance team.

Thanks axperf team :)

reference from : http://learnax.blogspot.in/2012/02/enabledisable-fact-boxes-preview-panes.html

Wednesday, October 23, 2013

Sequence of methods in form and table in AX


Form:
Sequence of Methods calls while opening the Form
Form — init ()
Form — Datasource — init ()
Form — run ()
Form — Datasource — execute Query ()
Form — Datasource — active ()
Sequence of Methods calls while closing the Form
Form — canClose ()
Form — close ()
Sequence of Methods calls while creating the record in the Form
Form — Datasource — create ()
Form — Datasource — initValue ()
Table — initValue ()
Form — Datasource — active ()
Sequence of Method calls while saving the record in the Form
Form — Datasource — ValidateWrite ()
Table — ValidateWrite ()
Form — Datasource — write ()
Table — insert ()
Sequence of Method calls while deleting the record in the Form
Form — Datasource — validatedelete ()
Table — validatedelete ()
Table — delete ()
Form — Datasource — active ()
Sequence of Methods calls while modifying the fields in the Form
Table — validateField ()
Table — modifiedField ()

Table:
When you press CTR+N
initValue()->

When you change data in a field
validateField() -> validateFieldValue() -> ModifiedField() -> ModifiedFieldValue()

When you close the table after entering some data
validateWrite() – > Insert() -> aosValidateInsert()

When you Save the Record for the first time
validateWrite() ->Insert() – > aosValidateInsert()

When you modify the record and saving
validateWrite() -> update() – > aosValidateUpdate()

When you delete the record
validateDelete() -> delete() -> aosValidateDelete()


reference : http://axvuongbao.blogspot.in/2013/09/sequence-of-methods-in-form-and-table.html

Monday, September 2, 2013

Simple UI Builder Class in SSRS Report in AX 2012

This UI Builder class is simple class with less code and less effort. UI Builder Class is needed when you want to customize your dialog which pop ups when you open a Report. UI Builder Class helps you to add run time lookups and other controls on the dialog form.
Step1 : Your Class must extends SrsReportDataContractUIBuilder
class SimpleDemoUIBuilder extends SrsReportDataContractUIBuilder
{
DialogField dialogEmplId;
DialogField dialogName;
boolean enable;
SimpleDemoContract contract;
}// two fields emplId and Name will reflect in the lookup in dialog form at the time of report opening.
Step2 : Override the build method
public void build()
{
contract = this.dataContractObject();
dialogEmplId = this.addDialogField(methodStr(SimpleDemoContract, parmEmplId),contract);
}// this method used for adding the field  which is from contract class.
Step3 : Write this below code to get lookup
private void emplIdLookup(FormStringControl emplIdlookup)
{
Query query = new Query();
QueryBuildDataSource qbds_EmplTable;
SysTableLookup sysTableLookup;
// Create an instance of SysTableLookup with the current calling form control.
sysTableLookup = SysTableLookup::newParameters(tableNum(FilterDemo), emplIdlookup);
// Add fields to be shown in the lookup form.
sysTableLookup.addLookupfield(fieldNum(FilterDemo,EmplId));
sysTableLookup.addLookupfield(fieldNum(FilterDemo,Name));
qbds_EmplTable = query.addDataSource(tableNum(FilterDemo));
sysTableLookup.parmQuery(query);
// Perform the lookup
sysTableLookup.performFormLookup();
}
Step4 : Override this method
public void getFromDialog()
{
contract = this.dataContractObject();
super();
}
Step5 : Override this method
public void initializeFields()
{
contract = this.dataContractObject();
}
Step6 : Override this method
public void postBuild()
{
super();
dialogEmplId = this.bindInfo().getDialogField(this.dataContractObject(),methodStr(SimpleDemoContract,parmEmplId));dialogEmplId.registerOverrideMethod(methodStr(FormStringControl, lookup),
methodStr(SimpleDemoUIBuilder,emplIdLookup), this);dialogEmplId.lookupButton(2);
}
the Contract Class code and DP class have already been added to the blog. please check it for further reference but one important part has to be added to the contract class i.e in class declaration, the following part has to be updated.

[DataContractAttribute,SysOperationContractProcessingAttribute(classstr(SimpleDemoUIBuilder))]

Working with SSRS reports in Dynamics AX 2012

Microsoft Dynamics AX provides a model-based approach for creating reports by providing project templates and modeling tools that are incorporated into the Microsoft Visual Studio development environment. The reporting features provided by Microsoft Dynamics AX are tightly integrated with SQL Server Reporting Services.
Reporting Services is a server-based reporting platform that provides comprehensive reporting functionality for a variety of data sources. The reporting framework includes a set of tools for you to define reports in the Microsoft Visual Studio development environment. The report development experience takes advantage of extended SQL Server tools and components fully integrated into the Microsoft Visual Studio environment. By using the reporting APIs, you can integrate or extend data and report processing in custom applications. The following table provides links to more information on these Microsoft technologies:
You can refere following url for more information about report development with SSRS,Dynamics AX 2012. 

Setting SysEntryPointAttribute for Services [AX 2012]

The SysEntryPointAttribute indicates what authorization checks are performed for a method that is called on the server. This attribute must be set for all service operations. For more information about how to set attributes on X++ methods, see Syntax for Attribute Classes.
The AIF Document Service Wizard automatically decorates service operations with [SysEntryPointAttribute(true)]. When you develop custom services you must use theSysEntryPointAttribute to decorate each service operation.
Setting :
The following table describes the possible values for the constructor of the SysEntryPointAttribute class.
[SysEntryPointAttribute(true)] - Indicates authorization checks are performed on the calling user for all tables accessed by the method.

[SysEntryPointAttribute(false)] - Indicates authorization checks are not performed on any tables accessed by the method.

Example :
[AifDocumentCreateAttribute, SysEntryPointAttribute(true)]
public AifEntityKeyList create(CustCustomer _custCustomer)
{
    return this.createList(_custCustomer);
}

reference : http://technet.microsoft.com/en-us/library/hh801193.aspx

Thursday, August 22, 2013

WINAPI functions and their use

Like most AX developers I use the WINAPI class quite often. Its a very useful class when handling files that need to be accessed outside of the AX environment

  static void FO_WinApi(Args _args)
  {
      str     root        = "C:";
      str     path        = "C:\\dionne";
      str     fileName    = "SalesInvoice.pdf";
      str     fileName2   = "SalesInvoice1.pdf";
      str     file        = path + "\\" + fileName;
      str     file2       = path + "\\" + fileName2;
      int     x, y;
      ;

      // Does folder exist?
      print WinAPI::folderExists(path);

      // Does file exist?
      print WinAPI::fileExists(file);

      // Copy file.
      print WinAPI::copyFile(file,file2);

      // New file exists?
      print WinAPI::fileExists(file2);

      // Delete new file.
      print WinAPI::deleteFile(file2);

      // New file still there?
      print WinAPI::fileExists(file2);

      // Get current cursor position.
      [x, y] = WinAPI::getCursorPos();

      print x;
      print y;

      // Get time and date format.
      print WinAPI::getSystemLocaleDateStr();
      print WinAPI::getSystemLocaleTimeStr();

      // Gets current computer name.
      print WinAPI::getComputerName();

      // Gets total disk space.
      print int2str(WinAPI::getDiskTotalSpaceInKb(root)
             / 1000) + " MB";

      // Gets current free space on disk.
      print int2str(WinAPI::getDiskFreeSpaceInKb(root)
             / 1000) + " MB";

      // Date when file was last accessed.
      print WinAPI::getFileAccessedDate(file);

      // Time when file was last accessed(In seconds).
      print WinAPI::getFileAccessedTime(file);

      // Gets path to temp directory.
      print WinAPI::getTempPath();

      // Gets a generated temporary filename, prefix "FO_".
      print WinAPI::getTempFilename(path, "FO_");

      pause;

  }
In addition to file information the WINAPI class can execute different file types from within Dynamics AX by of course using the file name as a parameter.
For example lets say you want to launch a PDF file saved in table within AX. WinAPI::ShellExecute() will do this for you.
- See more at: http://www.winfosoft.com/blog/microsoft-dynamics-ax/the-winapi-class#sthash.3QzP3keO.dpuf


reference from :http://www.winfosoft.com/blog/microsoft-dynamics-ax/the-winapi-class

Wednesday, August 14, 2013

Monday, August 12, 2013

AX 2012 : How to create new number sequence ?

Number sequences in Dynamics AX are used to generate specifically formatted numbers for record identification. for example Sales Id, Purchase Id, Journal number etc.
Very often we need to customize functionality which require new number sequence to be generated for new table designed.Dynamics AX contains a list of NumberSeqApplicationModule derivative classes, which holds the number sequence setup data for the specific module. These classes are read by the number sequence wizard, which detects existing number sequences and proposes to create the missing ones or newly added ones.
Suppose we have created new table “KitTable” with fields KitId and KitName, and we have to generate number sequence for KitId. This table belongs to Sales module.
Lets look at the steps to do this job :
1. Open the NumberSeqModuleCustomer class in the Application Object Tree (AOT), and add the following code to the bottom of the loadModule() method:
datatype.parmDatatypeId(extendedTypeNum(KitId));
datatype.parmReferenceHelp(“Kit ID”);
datatype.parmWizardIsContinuous(false);
datatype.parmWizardIsManual(NoYes::No);
datatype.parmWizardIsChangeDownAllowed(NoYes::Yes);
datatype.parmWizardIsChangeUpAllowed(NoYes::Yes);
datatype.parmWizardHighest(999);
datatype.parmSortField(20);
datatype.addParameterType(NumberSeqParameterType::DataArea, true, false);
this.create(datatype);
2. Create a new job with the following code and run it:
static void NumberSeqLoadAll(Args _args)
{
NumberSeqApplicationModule::loadAll();
}
3. Run the number sequence wizard by clicking on the Generate button inOrganization administration | Common | Number sequences | Number sequences, and click on the Next button, as shown in the following screenshot:
4. Click on Details to view more information. Delete everything apart from the lines where Area is Accounts receivable and Reference is Kit Id. Note the number sequence codes, and click on the Next button.
5. On the last page, click on the Finish button to complete the set up.
6. The newly created number sequences can now be found in Organization administration | Number sequences | Number sequences
7. Open Organization administration | Number sequences | Segment configurationand notice the new Kit Id reference.
8. Open Accounts receivable | Setup | Accounts receivable parameters and go to the Number sequences tab page. Here we should see the new number sequence code.
9. The last thing to do is to create a helper method for this number sequence. Locate theCustParameters table in the AOT and create the following method:
public server static NumberSequenceReference numRefKitId()
{
return NumberSeqReference::findReference(extendedTypeNum(KitId));
}
Now lets see how the above code works :
We added a number sequence initialization code into the NumberSeqModuleCustomerclass. This class holds the initialization of all number sequences that belong to the Accounts receivable module. The code in the loadModule() method defines the default number sequence settings to be used in the wizard, such as data type, description, highest possible number, and so on.
Additional options, such as starting sequence number, number format, and others could also be added here. All mentioned options could be changed while running the wizard. The addParameterType() method is used to define number sequence scope. In the example we created a separate sequence for each Dynamics AX company.
Before we start the wizard, we need to initialize number sequence references. This is normally done as a part of the Dynamics AX initialization checklist, but in this example we have to execute it manually by calling the loadAll() method of theNumberSeqApplicationModule class.
Next, we will run the wizard. We will skip the welcome page and in the second step of the wizard, the Details button can be used to display more options. The options can also be changed later in the Number sequences form before or even after the number sequence is actually used. The last page shows an overview of what will be created. Once completed, the wizard creates new records in the Number sequences form for each company.
The newly created number sequence reference appears in the Segment configurationform. Here we can see that the Data area checkbox is checked, meaning that we will have separate number lists for each company. The number sequence setup can normally be located in the module parameter forms.

Friday, July 19, 2013

How can I see the SQL query that the Dynamics AX Kernel is generating for my Form?

When you are debugging your solution you sometimes might want to see the SQL Query the Dynamics AX Kernel has generated for your Form. 
While you can of course trace this directly at your Database Server, you also can do this in X++ using the QueryBuildDataSource class.

Let's imagine you have a Form that has PurchTable as Data Source. You have to override the executeQuery method of the PurchTable Data Source and add the following code:

public void executeQuery()
{
   Query q;
   QueryBuildDataSource qbds;
   ;
   q = this.query();
   qbds = q.dataSourceName("PurchTable"); //Replace with the                                                 current Table
   info( qbds.toString() );

   super();
}

Thursday, July 11, 2013

Friday, May 3, 2013

Management Reporter 2012 server installation and configuration


Run the downloaded ManagementReporter2012-en-us.exe and select a location for the installation files to be extracted to;
Choose directory for extracted files
Once extraction is complete, hit OK;
Extraction Complete
In the extract location you’ll see a collection of files and a pkg folder. Double click the Setup.exe to start the installation process and select Install Management Reporter Server;
Management Reporter Setup
Accept the terms of the License Agreement after reading it;
Management Reporter Setup - Microsoft Software License Terms
Select or confirm the destination folder;
Management Reporter Setup - Specify Destination Folder
Click Install to confirm the installation;
Management Reporter Setup - Ready to Install Management Reporter
Management Reporter will then install before confirming a successful installation;
At this stage you can choose to start the Configuration Console of Management Reporter when you click finish. You can also proceed further without selection of check box and configure it afterwards.
Configuring Management Reporter 2012:

The configuration is done using the Configuration Console which is installed as part of the server installation, so in my case it is on the Reporting Server (RPT1).
To start the Configuration Console go to Start >> All Programs >> Microsoft Dynamics >> Management Reporter 2012 >> Configuration Console. Once started it will detect that configuration has not yet been done and present you with the Custom Configuration wizard;
Configure Management Reporter - Custom Configuration
By default both Microsoft Reporter Application Service and Management Reporter Process Service will be checked, and as I am dealing with Management Reporter integrated with Dynamics GP I also need to select Add Microsoft Dynamics GP;
Configure Management Reporter - Custom Configuration
If any prerequisites are missing, such as the Access Database Engine, you will be shown them and given the opportunity to install them before proceeding;
Configure Management Reporter - Prerequisite Validation
Next you need to configure the Service account. For a production environment this should always be a custom account with restricted privileges and a password that never expires (if you type in the username, ensure the Domain element is in all caps; e.g. DOMAIN\DynamicsGPuser) and supply the password;
Configure Management Reporter - Settings
Next, the database configuration needs to be completed. Enter the name of the SQL Server that the Management Reporter database will live on (in my case RPT1) and select the authentication method, either accept the default ManagementReporter database name or supply your own, enter a master key for encrypting sensitive information and select your Management Reporter administrator user (this will default to the logged in user);
Configure Management Reporter - Settings
Configure the port which should be used for the Application Service (4712 is the default (this is the same port as Management Reporter 2).
You also need to define the Dynamics GP connection information (the eagle eyed among you will spot the Database server has been spcified as GPLIVE and not SQL1; this is because I have created a CNAME alias for the GP Server so I can move the installation in future to a new server without having to reset all passwords) and select the system Database;
Configure Management Reporter - Settings
Check the configuration summary and then click Configure to proceed;
Configure Management Reporter - Ready to Configure
Once configure is complete this will be confirmed or any errors reported;
Configure Management Reporter - Ready to Configure
Once you click close you’ll be returned to the Management Reporter Configuration Console where you can see the status of Management Reporter;
Management Reporter 2012 Configuration Console
To add companies from Microsoft Dynamics GP, select Management Reporter Services >> ERP Integrations >> SERVER (DYNAMICS) in the Navigation Pane and click the Import button on the Server (DYNAMICS) detail pane;
Management Reporter 2012 Configuration Console
You will be prompted to enter the GP credentials (in this case I used the sa user);
Enter credentials
You’ll be presented a list of companies which can be imported, and can select companies which have already been imported or those which should be skipped. When you’re ready click the Import Companies button located at the bottom right of the window;
Management Reporter 2012 Configuration Console
Management Reporter 2012 Configuration Console will confirm that the selected companies have been imported;
Management Reporter 2012 - 1 companies were imported successfully
And that is the final part of the Management Reporter 2012 server configuration process. Next up is the client installation process…


Tuesday, April 30, 2013

Announcing Compatibility Certification of SQL Server 2012 and SQL Server 2012 SP1 with Dynamics AX 2009 SP1

Dynamics AX In-Market Engineering Team is proud to announce the following compatibility of released version of Dynamics AX with SQL Server 2012 and SQL Server 2012 SP1.
Required Hotfix with KB Number: 2836535

Microsoft ProductDynamics AX Versions
SQL Server 2012 and SQL Server 2012 SP1Dynamics AX 2009 SP1


The System requirements of Dynamics AX 2009 SP1 have been updated. 

Reference : https://community.dynamics.com/ax/b/dynamicsaxsustainedengineering/archive/2013/04/18/announcing-compatibility-certification-of-sql-server-2012-and-sql-server-2012-sp1-with-dynamics-ax-2009-sp1.aspx#.UX7LR8pYWSo 

Thursday, April 18, 2013

Duplicate company in AX 2012


The Duplicate Company function in AX 2009 is deprecated in AX 2012, and the reason is "The organization model represents a paradigm shift in Microsoft Dynamics AX 2012", said by Microsoft. To copy a company in AX 2012 for demo or test, now you'll have to
  1. create a definition group
  2. export the def group from old company
  3. import the def group to the new company
When you create def group, go to Include table group tab and make sure you've selected the tables you want to bring into your new company. When you import, go to the Advanced tab and select/deselect the Include shared tables checkbox as it's needed. Microsoft has a very detailed tutorial on this process:

Wednesday, April 3, 2013

Debugging Microsoft Dynamics AX 2009 SSRS reports with Microsoft Visual Studio 2008


While Microsoft SQL Server Reporting Services (SSRS) reports allowed in in Dynamics AX 4.0 a user to create Ad'hoc reports that were only based on the data stored in the Dynamics AX database, in Dynamics AX 2009 Production reports allow also the execution of Business Logic. The Business Logic can either be X++ code in the AOT or C# code directly in the SSRS report.
This also brings up the question how the C# code could be debugged when necessary. You can use the Visual Studio 2008 integrated debugger however you need to follow certain steps otherwise your breakpoints will not be hit.
You need a PC where the following components are installed:
  • Microsoft Dynamics AX 2009 Client,
  • Microsoft Dynamics AX 2009 Reporting Tools,
  • Microsoft SQL Server 2005 or 2008 Reporting Services,
  • Microsoft Dynamics AX 2009 Reporting Extensions, and
  • Microsoft Visual Studio 2008
Note:In the following example we use a report that is based on Microsoft SQL Server Analysis Services (SSAS) data. Therefore the Dynamics AX default cubes need to exist, however SSAS does not necessarily need to be locally installed.
In the following steps I will explain how you can debug the standard SSRS / SSAS reportCust.CashInflowvsCashOutflow for example:
  1. Start the Dynamics AX Client, open the AOT window and go to AOT\Report Libraries
     
  2. Click with the right Mouse button at the Cust report library and select Edit in Visual Studio from the context menu
     
  3. Wait until the Visual Studio IDE has launched completely
     
  4. Make sure the active configuration of the Solution is set to Debug (to check the Active configuration go toBuild - Configuration Manager...)
     
  5. Rebuild the whole Solution by selecting Build - Build Solution
     
  6. Deploy the Solution to your Microsoft SQL Server Reporting Services by selecting Build - Deploy Solution
    (Note: It is important to deploy the Solution from within Visual Studio even if the SSRS reports were already deployed and did not change since then!)
     
  7. Open the report CashInflowvsCashOutflow from the Visual Studio Solution Explorer window
     
  8. In the Report Explorer window expand the node Data Methods and double click at GetDefaultCompany
     
  9. Place a breakpoint (e. g. by pressing the [F9] key) at any line of code
     
  10. Start the Internet Explorer and navigate to your Microsoft SQL Server Reporting Services Report Managerpage (e. g. http://localhost/reports)
     
  11. Click at the Dynamics folder in the Report Manager page
     
  12. Go back to Visual Studio and select Tools - Attach to Process from the menu
     
  13. Make sure the options Show processes from all users and Show processes in all sessions are enabled(checked)
     
  14. The next step is different based on the version of Microsoft SQL Server Reporting Services:
    1. If you are using Microsoft SQL Server 2008 Reporting Services:
      In the list of processes located the process ReportingServicesService.exe and attach to this process
       
    2. If you are using Microsoft SQL Server 2005 Reporting Services:
      In the list of processes located the process w3wp.exe and attach to this process (If you have more than one w3wp.exe process listed, see the appendix at the end how to determine the correct process)
       
  15. Go back to the Report Manager page in Internet Explorer and execute the reportCust.CashInflowvsCashOutflow.FullPage
     
  16. The breakpoint will be hit by the Visual Studio integrated debugger
     
Some more hints:
  • On Windows Vista and Windows Server 2008 make sure you run Visual Studio with elevated privileges (Run as Administrator)
     
  • Once the debugger is attached you can check what modules are loaded in the Visual Studio integrated debugger by selecting Debug - Windows - Modules from the menu (The Assembly the C# code is compiled to is Cust.BusinessLogic.DLL)
     
How can I determine the correct w3wp.exe process to attach to?
The Microsoft SQL Server Reporting Services 2005 are hosted in the Microsoft Windows Server Internet Information Services (IIS). Therefore the process to attach to for debugging is the IIS Worker Process (w3wp.exe). As IIS is starting at least one Worker Process per Application Pool, more than one w3wp.exe processes are usually running on a Windows Server.
In order to see what Worker Process is serving what IIS Application Pool tools exists:
  • On Windows Server 2003 (IIS 6.0) run: iisapp.vbs
  • On Windows Server 2008 (IIS 7.0) run: appcmd.exe list wp
The output of the tools looks as follows:
C:\Windows\system32>iisapp.vbs
W3WP.exe PID: 2056 AppPoolId: AxReportServer
W3WP.exe PID: 5092 AppPoolId: EP - 39014

C:\Windows\system32\inetsrv>appcmd.exe list wp
WP "6916" (applicationPool: SharePoint Central Administration v3)
WP "1356" (applicationPool: AxReportServer)
Once identified the correct w3wp.exe process (based on the Application Pool) use the PID (Process ID) to attach to the correct w3wp.exe process.
--author:Alexander Lachner
--editor:Alexander Lachner
--date:16/06/2009

Source : http://blogs.msdn.com/b/emeadaxsupport/archive/2009/07/16/debugging-the-business-logic-in-microsoft-dynamics-ax-2009-ssrs-reports-with-microsoft-visual-studio-2008.aspx

Saturday, March 9, 2013

Reproting Extension installation process tips and triks

Hi,

While installation of Reporting Extension of AX 2009 we are facing lots of Errors and Warning, so this post is for some tips and tricks regarding  installation of Reporting Extension as much as possible without of Errors and Warning.

1. Install all the prerequisite for reporting extensions.
2. Configure the Reporting services with the use of Reporting services configuration manager from configuration tool of SQL server 2008
3. Check the URL both reporting service url and reporting manager url from configuration services for accessing and proper running.
4. In the Dynamics AX 2009 >> Administration >> setup>> Reporting services .. Update the information regarding reporting services and create folder named DynamicsAX and click on the create button to create Datasource on the reporting manager URL.
5. Install reporting Extensions from AX 2009 setup
6. reset the IIS
7. Deploying  reports : Please do this activity with the login of BCPROXY user only.
Run report deployment tool from Dynamics AX 2009
8. Do not deploy all the reports at a time.
9 Deploy the reports one by one or select the some bunch of reports ( like all reports which start from letter B,C,D...or else )
10. Please do not deploy or select any reports which start with letter "S".
11. In Between this you might get warning with HTML code and reports failed to deploy at this time the general solution is to restart the Reporting services from Services.msc
12. And at the end you can deploy the all remaining reports.


----
Kishor

Friday, March 8, 2013

Report Deployment Errors in AX 2009

While deployment of reports (Reporting Extensions) in Ax 2009 the following error has been generated. 

Error:
Unable to connect to http://server:port/ReportServer/ReportService2005.asmx as specified in the config file for the report server at DriveName:\Program Files\Microsoft SQL Server\MSRS10.MSSQLSERVER\Reporting Services\ReportServer\RSReportServer.config. 

If this url is not correct please update the config file, otherwise make sure the report server is configured correctly.

Solution:

Go to Encryption Keys >> Delete Encrypted Content >> Delete 


------


Monday, March 4, 2013

Sharepoint services 3.0 Installation


Hardware and Software Requirements
Before you install WSS 3.0, make sure your computer has the recommended hardware and software. Your server computer must meet the following hardware and software requirements.

Hardware Requirements

- A dual-processor computer with processor speed 2.5 GHz or higher.
- A minimum of 1GB RAM; however 2GB RAM is recommended for improved performance.

Software Requirements
- Windows Server 2003 SP2 as the Operating System.
- The file system used by the OS must be NTFS. 
- The computer must be configured as a web server running Microsoft Internet Information Services (IIS) in IIS 6.0. 
- .NET framework v3.0 or higher which enables ASP.NET 2.0 and includes Windows Workflow Foundation 3.0.
- SQL Server 2005 Express Edition with Advanced Settings.
Installing WSS V3.0 (Basic Mode)
Prerequisites

- Windows Server 2003 Enterprise Edition with SP2 installed.
- .NET Framework 3.0.
- ASP.NET 2.0 installed and Web Services Extension enabled.
- SQL Server 2005 with Advanced Settings installed.

Installation Steps
  1. Double click the Sharepoint.exe, it will start the installation process.
  2. Choose the installation type you want to install (from Basic, Advanced), here Basic is chosen.
  3. The setup will now apply the updates to the installation.
  4. Click Next to continue with the installation.
  5. The setup will now configure with the installation settings and installation will complete. The following screens will guide you through the process.


    Figure 1.1 Basic Mode installation of WSS3.0


    Figure 1.2 Applying updates to the installation.


    Figure 1.3 Configuration Wizard in Basic Mode of installation.


    Figure 1.4 Configuration of WSS 3.0 is complete with default configuration.
    Installing WSS 3.0 (Advanced Mode)
    Prerequisites
    - Windows Server 2003 Enterprise Edition with SP2 installed.
    - .NET Framework 3.0.
    - ASP.NET 2.0 installed and Web Services Extension enabled.
    - SQL Server 2005 with Advanced Settings installed.

    Installation Steps
  1. Double click the Sharepoint.exe, it will start the installation process.
  2. Choose the installation type you want to install (from Basic, Advanced), here Advanced is chosen.


    Figure 1.5 Advanced Mode installation of WSS 3.0
     
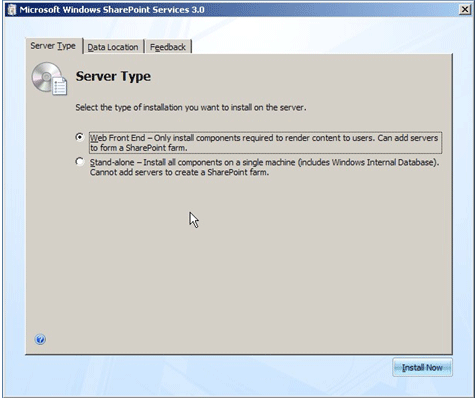
  3. In Server type tab; there will be two option as Web Front End and Stand-Alone.
    a. Web-Front End: Only install components required to render content to users. Can add servers to form a SharePoint Farm.
    b. Stand-Alone: Install all components on a single machine (Includes Windows Internal Database). Cannot add servers to create a SharePoint Farm.
  4. Here in this installation Web Front End server type is chosen. As in this server type we can add servers to form a SharePoint Farm.
  5. In Data Location tab: choose the path of your search index files to be stored on the local hard drive.
  6. Start the installation by clicking on Install Now.


    Figure 1.6 Selecting the Server type.


    Figure 1.7 Choosing the location where the Data files will be stored.


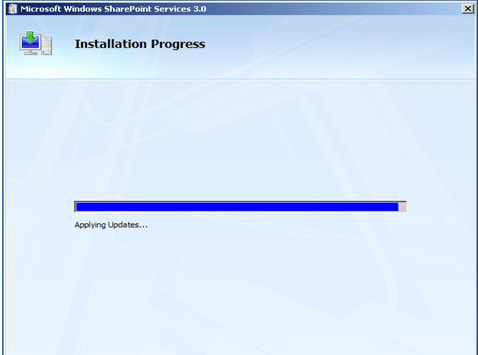
    Figure 1.8 Starting the installation and applying updates.
  7. After the installation is finished the configuration wizard will start; by checking the box prompted as "Run the SharePoint Products and Technology Configuration Wizard now". As shown below


    Figure 1.9 Finishing the installation & starting the configuration wizard.
    Configuring SharePoint Products and Technology
    Prerequisites
    - Name of database server and database where server farm configuration data will be stored.
    - Username and password for the database access account that will administer the server farm.

    Configuration Steps
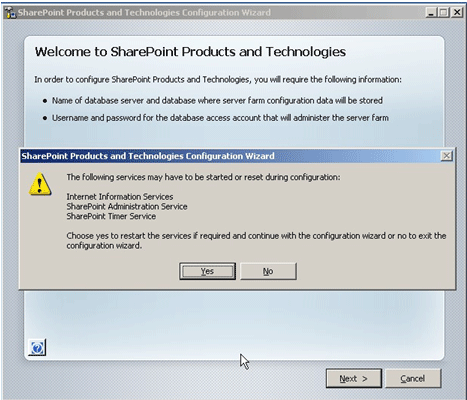
  1. The configuration wizard requires the following services to be started or reset during the configuration
    • Internet Information Services.
    • SharePoint Administration Services.
    • SharePoint Timer Service.
    By clicking Yes the services are started or reset and to proceed for the configuration wizard.
     
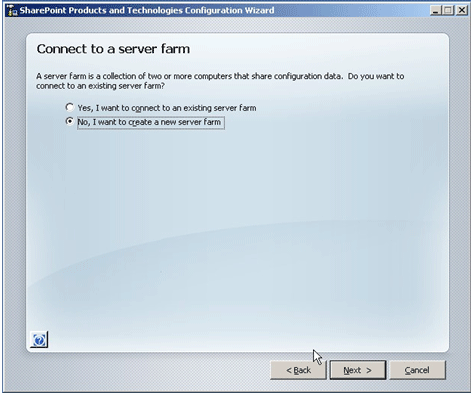
  2. The Next screen in the wizard asks for the following options
     
    • Connect to an existing server farm.
    • Create a new server farm.

    If there is a server farm you want to connect with to share configuration data; then connect to the server farm or create a new one.
    Here creating a new farm is selected, as there was no availability of server farms in the system.


    Figure 1.10 Requirements to proceed with configuration wizard.


    Figure 1.11 Connect to a Server Farm.
     
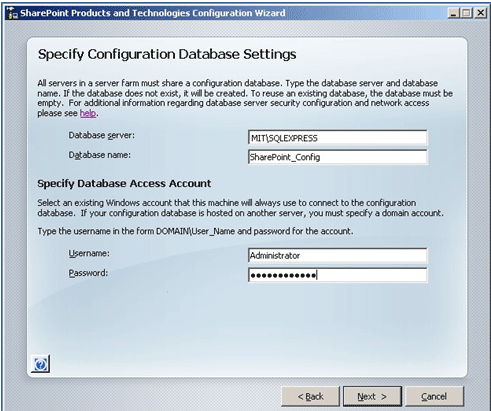
  3. The next screen will ask to specify the configuration for Database Settings. Such as the following details:
     
    • Database Server Name.
    • Database Name.
    • Database Access Account Username.
    • Database Access Account Password.

    The following figure describes the configuration for database settings.


    Figure 1.12 Configuring Database Settings.
     
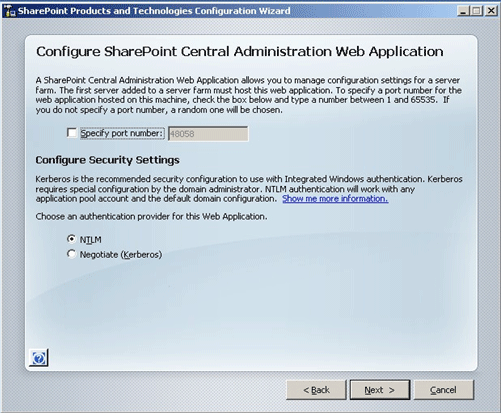
  4. The next screen configures SharePoint Central Administration Web Application. It asks for the following requirements to specify such as:
     
    • Specifying a port number for the web application hosted on this machine; the port number can be a number in between 1 to 65535. Otherwise system will take a random port number.
    • Choosing an authentication provider for this Web application.
      -> NTLM: NT LAN Manager is a Microsoft authentication protocol.
      -> Kerberos: It is a computer network authentication protocol, which allows individuals communicating over a non-secure network to prove their identity to one another in a secure manner.

    Here the NTLM authentication is chosen.


    Figure 1.13 Configure SharePoint Central Administration Web Application.
     
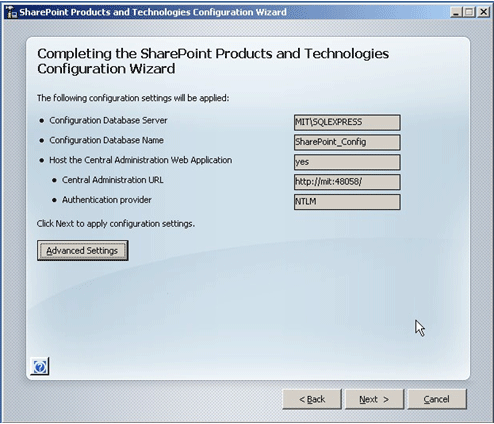
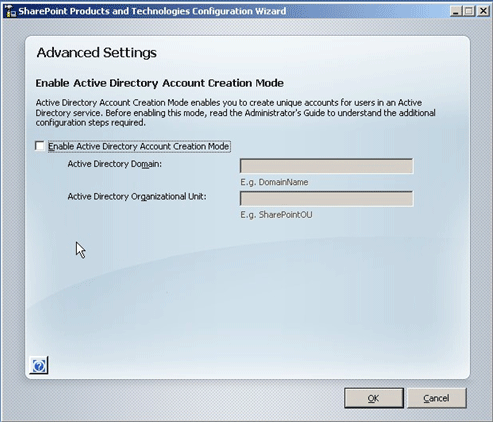
  5. Complete the wizard by clicking Next or we can click Advanced Settings to enable the Active Directory creation Mode by providing Active Directory Domain and Organizational Unit.
Active Directory: It is a hierarchical collection of network resources that can contain users, computers, printers, and other Active Directories. Active Directory Services (ADS) allow administrators to handle and maintain all network resources from a single location. 


Figure 1.14 Completing the configuration wizard.


Figure 1.15 Advanced Settings for Enabling Active Directory Account.


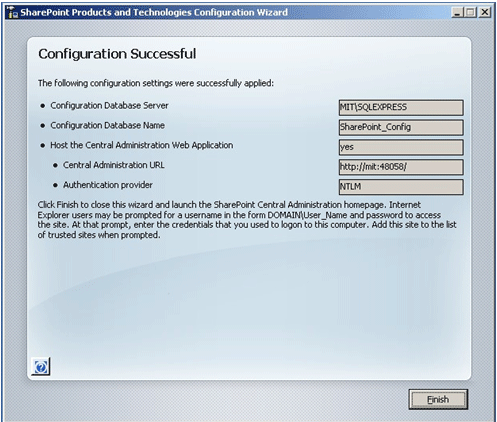
Figure 1.16 Click Finish to complete the configuration.
Summary
Basic Installation
In Basic installation mode we are provided with fewer options while installing. The setup continues with the default settings and configures the same.

Advanced Installation

In the case of advanced installation we are provided with ample options while installing as well as configuring. 
Such as:
  1. Server type
    • Web Front-end
    • Standalone
  2. Resetting or restarting of required services.
  3. Connecting to the Server Farm
    • Connect to the existing Server Farm.
    • Creating a new Server Farm
  4. Specifying Configuration Database Settings
    • Database Server
    • Database Name
  5. Specify Database Access Account
    • Username
    • Password
  6. Configuring SharePoint Central Administration Web Application
    • Specify Port Number
  7. Configure security Settings
    • NTLM security
    • Kerberos security
  8. Advanced Settings for Enabling Active Directory Account Creation Mode
    • Active Directory Domain
    • Active Directory Organizational Unit
The difference between the two modes of installation depends on the user needs. If the user needs to install and wants to configure later Basic Mode is chosen. If the user needs to install as well as configure in more detail then advanced mode is chosen.

The basic installation installs the SQL Server 2005 Everywhere Edition and creates a web application at port 80 based on the team site template. But advanced installation creates no default web application or installs the SQL Server. Advanced installation installs only the front-end components that are required to render the website. It assumes that SQL Server 2005 is already installed