Dynamics AX 2009 – Import Customer master,Vendor master and their Primary addresses
The following illustration is for vendors. Similarly we can do for customers . Wherever needed I have mentioned what change would be required.To import vendors & customers in Microsoft Dynamics AX 2009, follow these steps:
1. In the Navigation Pane, click Administration>Periodic> Data export/import>Excel spreadsheets> Template Wizard.
2. In the Excel Template Wizard, follow the instructions to create a template for “VendTable”. For customers the CustTable should be selected in the table selection step in the wizard.
When creating the template select the option to create a definition group in AX for this template.

Also select the ‘Create supporting table worksheet’. This will create the lookup values for selection in the template worksheet .

3. Ensure that the number sequence is setup for the address book Id in parameter for Global address book. Navigate to Basic>Setup>Global Address Book>Parameters.
Click the Number sequences tab, and then verify that a number sequence is selected for the address book ID.
Note The number sequence that is selected cannot be set up as continuous.
4. Prepare the data in the file that you created in step 2 with the data that you want to import. Ensure that the all mandatory fields are populated in correct format and there are valid values in the lookup fields.
5. Leave the Address book ID field empty. The Address book ID field is populated when you import the Excel spreadsheet by using the number sequence that you set up in step 3. Pls ensure that the Address book type is set to “organisation” in the data template as shown below.

6. Navigate to Administration>Periodic>Data export/import>Definition groups.
7. Select the definition group that you created by using the Excel Template Wizard, and then click Table setup.
8. In the Table setup dialog box, click the Import Criteria tab, and then add the following code in the Import Criteria tab after the default line in the window.
What we are doing here is that we are bypassing the code of importing the data through the standard AX’s data import code but would call the “Insert” method to read the file and do the import.
In the default line ‘vendTable’ object was declared for the table ‘VendTable’. Therefore, ensure that the correct object name is used in the code as well.
To import vendors, add the following code in the table setup’s Import criteria code.
;
vendTable.insert();// Insert method called to import the data
return false; // Bypass the standard AX data import code. Otherwise, the system will attempt to import the data twice and found that the record already exists.

For customers :
;
custTable.insert(); // Insert method called to import the data
return false; // Bypass the standard AX data import code. Otherwise, the system will attempt to import the data twice and found that the record already exists.

9. Click the Compile button.

This step determines whether the code is typed correctly.
10. Click the Preview tab, verify that the fields match the correct values that are entered in the Excel spreadsheet. Close the Table setup dialog box.

11. In the Data export/import dialog box, select the definition group that you created, and then click Import.

12. In the Excel import dialog box, If the Excel spreadsheet is not at the same path which is in ‘Default file name” column in the definition group then browse and select the Excel spreadsheet, and then click OK.

If its the same file at the path mentioned in the “default file location” then no need to select it again. System will pick it . Go ahead and press OK without selecting any file.
13. When the system finishes the importing the records you will get the following infolog :
OOOOOOPs

But don’t worry .. this infolog is for the Standard AX data import code . Since we have bypassed the code , we get this infolog. ( I do not want consultants here to bother the Techies for changing this /suppressing the infolog etc. They would feel too pricey. If we understand the concept then that is sufficient.
14. Verify that your Vendor is imported into the VendTable (vendor master) and the visible in Vendor form and that a corresponding record is created in the DirPartyTable table.


Good job so far .. smile
Check the address tab if it is created for the vendor.

The Vendor Address Type is blank and the Name has “Primary Address”. Therefore, a little fix is needed after the data is imported in the vendor / customer. We would need to run the following jobs. Copy them in AOT as jobs
15. Job 1 – Update the Vendor Address Type
static void J1A_UpdateVendAddressType(Args _args)
{
VendTable vendTab; // Replace VendTable with CustTable when run this for customers.
DirPartyTable dirPartyTab;
Address addTab;
;
ttsbegin;
while select vendTab
join dirPartyTab
join forupdate addTab
where vendTab.PartyId == dirPartyTab.PartyId &&
addTab.AddrTableId == dirPartyTab.TableId &&
addTab.AddrRecId == dirPartyTab.RecId //&& //Uncomment ‘&&’ if you wish to run for a single vendor else this would run for all vendors
// vendTab.AccountNum == ‘Shekhar’ //Uncomment this line to run for vendor ‘Shekhar’ only else this runs for all vendors
{
if(addTab.Name == ‘Primary address’) //Hardcoded , pls make sure the field is exactly same typed
{
addTab.type = AddressType::Payment; // If the job is being used for CustTable comment this line.
// addTab.type = AddressType::Invoice; // If the job is being used for CustTable uncomment this line.
addTab.update();
}
}
ttscommit;
}
Verify the fix in the vendor master’ address tab. : Good job ..smile

16. Job 2 – To update the Address Type for vendors.
static void J2A_UpdateVendAddressName(Args _args)
{
VendTable vendTab; // Replace VendTable with CustTable when run this for customers.
DirPartyTable dirPartyTab;
Address addTab;
;
ttsbegin;
while select vendTab
join dirPartyTab
join forupdate addTab
where vendTab.PartyId == dirPartyTab.PartyId &&
addTab.AddrTableId == dirPartyTab.TableId &&
addTab.AddrRecId == dirPartyTab.RecId //&& //Uncomment ‘&&’ if you wish to run for a single vendor else this would run for all vendors
// vendTab.AccountNum == ‘Shekhar’ //Uncomment this line to run for vendor ‘Shekhar’ only else this runs for all vendors
{
if(addTab.Name == ‘Primary address’ && addTab.type == AddressType::Payment) //Hardcoded , pls make sure the field is exactly same typed
{
addTab.Name = dirPartyTab.Name;
addTab.update();
}
}
ttscommit;
}
Verify the fix in the vendor master ; Done … Good Job again.

Now you have the vendor and customer master with the a primary address .. Proceed to the next hurdle in data migration.
Additional Addresses : I would update in my Next post how to update the Multiple addresses without much of the coding .
17. Note : I could find a very useful piece of information published by Microsoft on the subject and available at the following link. All consultants should have a look at this.
https://mbs.microsoft.com/knowledgebase/kbdisplay.aspx?wtntzsmnwukntmmyszrrnottukoostllwskmmqvylslnwrus&wa=wsignin1.0
I hope that the above helps all AX consultants.
1. In the Navigation Pane, click Administration>Periodic> Data export/import>Excel spreadsheets> Template Wizard.
2. In the Excel Template Wizard, follow the instructions to create a template for “VendTable”. For customers the CustTable should be selected in the table selection step in the wizard.
When creating the template select the option to create a definition group in AX for this template.

Also select the ‘Create supporting table worksheet’. This will create the lookup values for selection in the template worksheet .

3. Ensure that the number sequence is setup for the address book Id in parameter for Global address book. Navigate to Basic>Setup>Global Address Book>Parameters.
Click the Number sequences tab, and then verify that a number sequence is selected for the address book ID.
Note The number sequence that is selected cannot be set up as continuous.
4. Prepare the data in the file that you created in step 2 with the data that you want to import. Ensure that the all mandatory fields are populated in correct format and there are valid values in the lookup fields.
5. Leave the Address book ID field empty. The Address book ID field is populated when you import the Excel spreadsheet by using the number sequence that you set up in step 3. Pls ensure that the Address book type is set to “organisation” in the data template as shown below.

6. Navigate to Administration>Periodic>Data export/import>Definition groups.
7. Select the definition group that you created by using the Excel Template Wizard, and then click Table setup.
8. In the Table setup dialog box, click the Import Criteria tab, and then add the following code in the Import Criteria tab after the default line in the window.
What we are doing here is that we are bypassing the code of importing the data through the standard AX’s data import code but would call the “Insert” method to read the file and do the import.
In the default line ‘vendTable’ object was declared for the table ‘VendTable’. Therefore, ensure that the correct object name is used in the code as well.
To import vendors, add the following code in the table setup’s Import criteria code.
;
vendTable.insert();// Insert method called to import the data
return false; // Bypass the standard AX data import code. Otherwise, the system will attempt to import the data twice and found that the record already exists.

For customers :
;
custTable.insert(); // Insert method called to import the data
return false; // Bypass the standard AX data import code. Otherwise, the system will attempt to import the data twice and found that the record already exists.

9. Click the Compile button.

This step determines whether the code is typed correctly.
10. Click the Preview tab, verify that the fields match the correct values that are entered in the Excel spreadsheet. Close the Table setup dialog box.

11. In the Data export/import dialog box, select the definition group that you created, and then click Import.

12. In the Excel import dialog box, If the Excel spreadsheet is not at the same path which is in ‘Default file name” column in the definition group then browse and select the Excel spreadsheet, and then click OK.
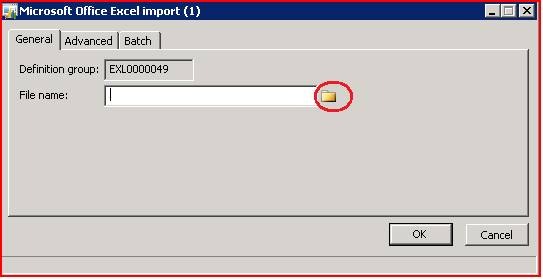
If its the same file at the path mentioned in the “default file location” then no need to select it again. System will pick it . Go ahead and press OK without selecting any file.
13. When the system finishes the importing the records you will get the following infolog :
OOOOOOPs

But don’t worry .. this infolog is for the Standard AX data import code . Since we have bypassed the code , we get this infolog. ( I do not want consultants here to bother the Techies for changing this /suppressing the infolog etc. They would feel too pricey. If we understand the concept then that is sufficient.
14. Verify that your Vendor is imported into the VendTable (vendor master) and the visible in Vendor form and that a corresponding record is created in the DirPartyTable table.


Good job so far .. smile
Check the address tab if it is created for the vendor.

The Vendor Address Type is blank and the Name has “Primary Address”. Therefore, a little fix is needed after the data is imported in the vendor / customer. We would need to run the following jobs. Copy them in AOT as jobs
15. Job 1 – Update the Vendor Address Type
static void J1A_UpdateVendAddressType(Args _args)
{
VendTable vendTab; // Replace VendTable with CustTable when run this for customers.
DirPartyTable dirPartyTab;
Address addTab;
;
ttsbegin;
while select vendTab
join dirPartyTab
join forupdate addTab
where vendTab.PartyId == dirPartyTab.PartyId &&
addTab.AddrTableId == dirPartyTab.TableId &&
addTab.AddrRecId == dirPartyTab.RecId //&& //Uncomment ‘&&’ if you wish to run for a single vendor else this would run for all vendors
// vendTab.AccountNum == ‘Shekhar’ //Uncomment this line to run for vendor ‘Shekhar’ only else this runs for all vendors
{
if(addTab.Name == ‘Primary address’) //Hardcoded , pls make sure the field is exactly same typed
{
addTab.type = AddressType::Payment; // If the job is being used for CustTable comment this line.
// addTab.type = AddressType::Invoice; // If the job is being used for CustTable uncomment this line.
addTab.update();
}
}
ttscommit;
}
Verify the fix in the vendor master’ address tab. : Good job ..smile

16. Job 2 – To update the Address Type for vendors.
static void J2A_UpdateVendAddressName(Args _args)
{
VendTable vendTab; // Replace VendTable with CustTable when run this for customers.
DirPartyTable dirPartyTab;
Address addTab;
;
ttsbegin;
while select vendTab
join dirPartyTab
join forupdate addTab
where vendTab.PartyId == dirPartyTab.PartyId &&
addTab.AddrTableId == dirPartyTab.TableId &&
addTab.AddrRecId == dirPartyTab.RecId //&& //Uncomment ‘&&’ if you wish to run for a single vendor else this would run for all vendors
// vendTab.AccountNum == ‘Shekhar’ //Uncomment this line to run for vendor ‘Shekhar’ only else this runs for all vendors
{
if(addTab.Name == ‘Primary address’ && addTab.type == AddressType::Payment) //Hardcoded , pls make sure the field is exactly same typed
{
addTab.Name = dirPartyTab.Name;
addTab.update();
}
}
ttscommit;
}
Verify the fix in the vendor master ; Done … Good Job again.

Now you have the vendor and customer master with the a primary address .. Proceed to the next hurdle in data migration.
Additional Addresses : I would update in my Next post how to update the Multiple addresses without much of the coding .
17. Note : I could find a very useful piece of information published by Microsoft on the subject and available at the following link. All consultants should have a look at this.
https://mbs.microsoft.com/knowledgebase/kbdisplay.aspx?wtntzsmnwukntmmyszrrnottukoostllwskmmqvylslnwrus&wa=wsignin1.0
I hope that the above helps all AX consultants.
No comments:
Post a Comment